Tag Archives: entertaining

Alicia Silverstone’s Raw Balls

21 May

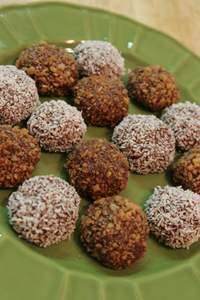
These things – omg omg omg – are the tastiest little morsels ever. Friends who’ve tried them have said

“That’s the best thing I’ve ever tasted”

and

“Those cannot possibly be sugar-free”

and other things that were unintelligible.

Lately I’ve been making them to control my sugar cravings in the post-lunch lull at work. Dates and pure maple syrup provide benefits such as fiber, potassium, manganese, zinc, and other nutrients, and the fat and protein in the almond butter, walnuts, and almonds counteract their natural sugars, meaning I don’t have the spike (and crash) that I would with something like a cupcake. These are also very rich, so I’m satisfied with one or two. Win!

My only critique of this recipe is that it needs a better name. I had to put Alicia’s name in front of it to give it some credibility. As it is, whenever I say it out loud, I have to say it in a silly voice – because inside, I am a prepubescent. Raw balls. I digress.

I have made these two different ways. Originally, I used carob chips and processed them into a powder, because my closest health food store didn’t sell carob powder. These are sweetened with malted corn and barley. I also used toasted almond butter, which is sweetened with organic unrefined cane sugar. And, I suppose, not technically raw.

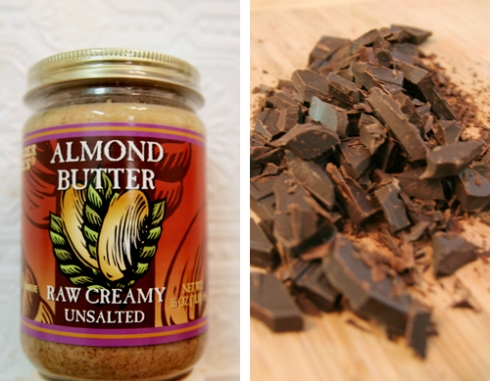
Then I wanted to make a truly refined-sugar-free version, so I processed a bar of unsweetened chocolate (100% pure cacao) and used raw almond butter, which is truly made from nothing but almonds.

Because of the fat and/or moisture content (?) in the chocolate, I wasn’t able to get a true powder consistency – it looked more like instant coffee that’s been hanging around too long – but it did the job.

The chocolate lent a bit more richness to this recipe than the carob, but I enjoy both. Of course, you could also sub unsweetened cocoa powder here. And you could use peanut butter or hazelnut butter instead of the almond… feel free to experiment!

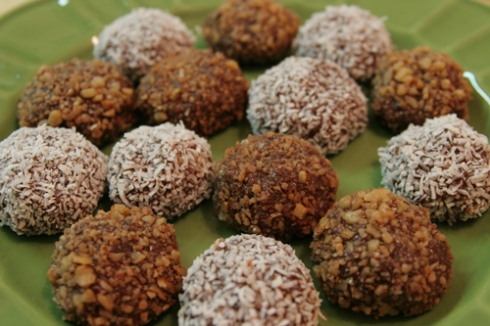
Once all the ingredients are processed into a dough, roll it into 1″-2″ balls, then roll in a topping of your choice. I did half in unsweetened shredded coconut and half in a mixture of cocoa powder, cinnamon, and walnuts.

These get pretty mushy at room temperature, so I’d recommend eating them straight out of the fridge. And if transporting, be sure to do so in a hard, sealed container and not a Ziploc bag… not that you or I would ever make such a mushy mistake…

To your health!

RECIPE – Alicia Silverstone’s Raw Balls

Adapted from The Kind Diet, by Alicia Silverstone
Makes 10 to 12 balls.

1/2 cup walnuts
1/2 cup pitted dates
1/2 cup raw carob powder
1/2 cup maple syrup
1/2 teaspoon vanilla extract
1/4 teaspoon fine sea salt
1/2 cup whole almonds
1/2 cup almond butter
Optional: shredded unsweetened coconut, cocoa powder, instant coffee powder, spices, nuts – for rolling

Place the walnuts in a food processor and process until coarsely ground. Add the dates, and pulse until well combined with the nuts. Add the carob powder, syrup, vanilla extract, and salt. Process until mixture is thick and smooth. Add the almonds, and pulse a few times until combined; you want them to remain in crunchy chunks. Transfer the mixture to a bowl and stir in almond butter with a sturdy spoon.

Form the mixture into golf-ball-size balls with your hands. Roll the balls in the topping of your choice. Place in a sealed container in the freezer until hardened.

Quinoa-Stuffed Bell Peppers

2 Feb

Cooking is like love. It should be entered into with abandon or not at all.
~Harriet Van Horne

Recipe source: Good Cheap Eats

stuffed red bell pepper

When cooking for guests, it’s always nice to have a “stunner” recipe in your repertoire – something that is beautiful to the eye, complex to the palate, enticing to the nose, and kind to the stomach. This is just such a recipe. It can be made as a main course or side dish, and is friendly to vegetarians and Celiacs alike.

The first step of this recipe is to prepare the filling. And the filling is so good, you might just want to stop there! (No, seriously… it’s great even by itself as a one-dish meal. Don’t fret if you have extra!)

Begin by cooking quinoa, carrots, and water in a covered saucepan for about 20 minutes.

carrots & quinoa

At the same time, saute onion, celery, and poblano pepper, season with cumin and garlic, and then add in sliced mushrooms and drained canned tomatoes.

onions & peppers

When the quinoa is tender, stir in black beans, shredded pepperjack cheese*, and the onion mixture. Your filling is now ready.

*Taste tip: You can make these vegan by omitting the cheese. Entertaining bonus! Everyone is welcome. 🙂

yummy quinoa mixture

Next, pour liquid from tomatoes into the bottom of a baking dish (a 9×13 glass dish worked well for me) and preheat the oven to 350 degrees F. If you’re making this recipe as a side, slice the bell peppers in half vertically and scoop out the seeds and as much membrane as possible.

*Shopping tip: For this serving especially, try to find peppers with the shallowest bottom possible. The curvier your peppers are, the less room you will have to fill them inside. After cutting one open, you’ll see what I mean.

stuffed green bell peppers

If these are going to be a main dish, cut only the tops off the peppers. If you reserve them, they make cute little hats at the dinner table! You can get creative with the colors of peppers you serve as well – I stuffed red and green peppers for a Christmas dinner last year.

stuffed red & yellow bell peppers

Fill each bell pepper with a heaping serving of filling, and place in the baking dish. Cover with foil and bake for 40 minutes, then uncover and sprinkle each pepper with a bit more cheese. Bake for another 15 minutes and let stand 5 minutes before serving.

RECIPE – Quinoa-Stuffed Bell Peppers

2 tablespoons olive oil
1 medium onion, finely chopped
2 ribs celery, finely chopped
1/2 of a poblano pepper, diced
1 tablespoon ground cumin
2 cloves garlic, minced
1 (8 oz.) pkg. mushrooms, thinly sliced
1 (15 oz) can diced tomatoes, drained, liquid reserved
3/4 cup quinoa
1 1/2 cups grated carrot
1 3/4 cups water
1 (15 oz.) can black beans, rinsed and drained
1 1/2 cups grated reduced-fat pepper Jack cheese, divided
4 large bell peppers, halved lengthwise to serve 8 or tops removed to serve 4

Heat oil in saucepan over medium heat. Add onion, celery, and poblano pepper and cook 5 minutes, or until soft. Add cumin and garlic, and sauté 1 minute. Stir in mushrooms and drained tomatoes. Cook 5 minutes, or until most of the liquid has evaporated.

In a separate saucepan with a lid, stir in quinoa, carrots, and water. Cover and bring to a boil. Reduce heat to medium-low and simmer 20 minutes, or until quinoa is tender. Combine quinoa and carrots with black beans, 1 cup of cheese, and the onion mixture from the first step. Season with salt and pepper, if desired.

Preheat oven to 350°F. Pour reserved liquid from tomatoes into the bottom of a baking dish.

Fill each bell pepper half with heaping 3/4-cup of quinoa mixture, and place in baking dish. Cover with foil and bake 40 minutes. Uncover and sprinkle each pepper with 1 tablespoon of remaining cheese. Bake 15 minutes more, or until tops of stuffed peppers are browned. Let stand 5 minutes. Transfer stuffed peppers to serving plates and drizzle with pan juices before serving.

Serves 4 as a main dish or 8 as a side.

Holiday treats: Sparking Cranberries & Spicy-Sweet Roasted Nuts

21 Dec

Recipe source: Sparkling Cranberries – 101 Cookbooks
Recipe source: Spicy Sweet Roasted Nuts – slashfood

Sparkling Cranberries

This post is written with many thanks to Heidi at 101 Cookbooks, for posting this recipe in the first place, and for her dedication to finding the just-right sugars for every step of the process. Better you than me, sister.

As with so many of my recipes, I found these little gems about a year ago and bookmarked them, only to forget about them. Then while I was scouring through my recipe-labeled emails to find an appetizer for Gourmet Friends, I discovered it again in an email I’d sent to myself. Thank you, Ghost of Christmas Past! These are a beautiful festive treat for a winter party, and very unique.

I’ve given only half the quantities of the original recipe here, because most people will only pop one or two each, for the novelty and intrigue. In general, people don’t go crazy over natural cranberries, and they’re sure to get some puckers from the kids, who think they look like candy. (Ha ha, suckers!) Rolling these berries perfectly is also incredibly time-consuming and laborious, and I think once you get to one cup, you won’t miss the second.

They really are pretty, though. I swear.

sparkling cranberries

To start, you’ll measure out a cup of fresh cranberries, making sure to pick out any shriveled or otherwise funky berries. Soak these overnight in a simple syrup (Heidi recommends making it with raw sugar, which gives a really nice molasses flavor).

cranberries

The next day, drain the berries. They should stay a little sticky and they’ll look really shiny and gorgemous. *ooooh, shiiiiiny*

While the berries are still wet, it’s time to roll them first in organic, unbleached sugar (a slightly bigger grain than your normal refined), and then in refined sugar. To set up a little station for yourself, you’ll need a bowl with your cranberries, a small bowl with organic unbleached sugar, a small bowl with regular refined sugar (and reserves of both), a slotted spoon, and the serving bowl for your finished cranberries. You’ll also want a comfy chair, ‘cuz this is gonna take a while.

cranberry rolling station

To coat, drop a berry into the organic sugar, shake off excess by tapping a slotted spoon against the bowl, then repeat in the refined sugar.

cranberry in sugar

Note: the sugar level in these bowls is too much. As you work through this process, some of the simple syrup will stay behind, creating lumps in your sugar. And that means lumps on your berries, which looks less like freshly fallen snow and more like the sludge the ice truck has pushed to the side of the road. You can see it starting a little in this picture, where I have attempted to roll entirely too many berries at once.

too many cranberries

In the end, though, with a little patience, you’ll get this very lovely result. I found that leaving these out, uncovered, made the sugar crunchy while keeping the inside delightfully juicy. Storing them in a covered bowl will soften the sugar some, and it’s not as nice. Over a couple days, the sugar will also start to clump and congeal, creating a weird cranberry-blob monster. So it’s best to roll these the same day you plan to serve them.

sparkling cranberries

Spicy-Sweet Roasted Nuts

This is a tried-and-true recipe I’ve made several times now, and it’s always a hit with a group of friends, or when I’m huddled away in my little work cubicle, storing up nuts for the winter. It’s also extremely easy to make.

nuts in measuring cup

You can use any combination of nuts for this, so long as they are raw. I usually buy raw nuts in bulk, but Trader Joe’s sells them as well, and for a decent price. My personal favorite mixture is cashews, almonds, pecans and walnuts. Sometimes I’ll use a few more cashews than almonds, as they seem to be the mildest and absorb flavor the best. And almonds are dry and they catch in my throat. *cough*

toasting nuts

Begin by dry-toasting the nuts in a large pan over a medium flame. Be sure to keep an eye on them so they don’t burn, and stir often. Eventually you will notice brown or black spots begin to appear; this is how you know they’re done.

In a small saucepan, melt butter and maple syrup together, then mix in fresh chopped rosemary and cayenne pepper to taste. Immediately pour this mixture over the toasted nuts, stir well to coat, and spread the nuts over a foil-lined baking sheet for easy cleanup. Sprinkle the nuts with sea or kosher salt and bake in a 350-degree preheated oven for about 20 minutes. Voila – you have it, a great party dish or gift.

spicy sweet roasted nuts

~ Happy Winter Solstice! ~

RECIPE – Sparkling Cranberries

For the simple syrup, raw cane sugar or real brown sugar lends a nice molasses flavor to the cranberries, but regular granulated sugar (or a blend of brown/white) will work.

1 cup cranberries, picked over
1 cup water
1 cup sugar (see head notes)
More sugar for coating: I do a mix of medium-grained organic sugar for the first coating, and then a second toss with regular granulated white sugar. You don’t want a huge grain for that first toss, just something larger than standard sugar, smaller than most turbinado sugars.

Place the cranberries in a medium glass bowl and set aside. Make a simple syrup by bringing the water and sugar just to a simmer in a medium saucepan. Let the syrup cool for a couple minutes and then pour it over the cranberries. If the syrup is too hot the cranberries will burst, so be careful. Cover and refrigerate overnight.

The next day, drain the cranberries and toss them with larger grained sugar until they are well coated. I only use a scoop of sugar at a time, and small batches of cranberries, so the sugar doesn’t get too damp. Place the coated cranberries on a baking sheet to dry for a few hours.

Do a second toss with the regular granulated sugar, this typically takes care of any sticky spots on the cranberries. Let dry another hour.

Makes 1 cup of sparkling cranberries.

RECIPE – Spicy Sweet Roasted Nuts

4 cups of raw nuts (almonds, walnuts, cashews, pecans)
4 tablespoons unsalted butter
4 tablespoons real maple syrup
1 tablespoon fresh rosemary, finely chopped
1/2 teaspoon cayenne pepper, more or less depending on your taste
2 teaspoons sea salt

In a large skillet, toast the nuts over medium heat, stirring occasionally so that they don’t burn. In a small saucepan, melt butter and maple syrup together. Once melted, add rosemary and cayenne. When the nuts are toasted (when the vast majority have darkened spots), pour the butter mixture over the nuts and toss to coat.

Spread the glazed nuts out on a parchment-lined cookie sheet (makes for far easier cleanup) and roast in a 350 degree oven for 15-20 minutes, depending on your desired level of roast.

When you take the nuts out of the oven, sprinkle the salt over the top, so that it adheres to the still-sticky nuts. I like to use the flaky Maldon sea salt for these nuts, but in a pinch, kosher will also do just fine.

White Bean Dip

20 Nov

“What garlic is to food, insanity is to art.”
Anonymous

Recipe source: Everyday Italian by Giada di Laurentiis

As Michael Jackson said, it doesn’t matter if you’re black or white. My Black Bean Hummus recipe had a Mexican flair, while this recipe is Italian. See, it really is possible to promote tolerance and world peace through food! Amen.

Like the black bean version, this dip is a quickie to whip up in the food processor. Actually, slightly more quickie, because there are fewer veggies to chop. So when you’re done… you can have a quickie?

Moving on. My recommendation for the garlic is to peel it and chop in large chunks. Whatever you do, don’t use a garlic press for this recipe – the food processer will take care of chopping it up, and the more intact you keep the clove, the stronger the bite will be. This dip is great for raw veggies, I made it to get some carrots into my belly this week!

white bean dip

RECIPE – White Bean Dip with Pita Chips

1 (15-ounce) can cannellini beans, drained and rinsed
2 cloves garlic
2 tablespoons fresh lemon juice
1/3 cup olive oil, plus 4 tablespoons
1/4 cup (loosely packed) fresh Italian parsley leaves
Salt
Freshly ground black pepper
6 pitas
1 teaspoon dried oregano

Preheat the oven to 400 degrees F.

Place the beans, garlic, lemon juice, 1/3 cup olive oil, and parsley in the work bowl of a food processor. Pulse until the mixture is coarsely chopped. Season with salt and pepper, to taste. Transfer the bean puree to a small bowl.

Cut each pita in half and then into 8 wedges. Arrange the pita wedges on a large baking sheet. Pour the remaining oil over the pitas. Toss and spread out the wedges evenly. Sprinkle with the oregano, salt, and pepper. Bake for 8 to 12 minutes, or until toasted and golden in color.

Serve the pita toasts warm or at room temperature alongside the bean puree.

Cake Truffles aka “Cake Balls”

11 Sep

There are four basic food groups: milk chocolate, dark chocolate, white chocolate, and chocolate truffles.
-Anonymous

Recipe source: Bakerella / Pioneer Woman

Go ahead. Snicker. It’s what I would have done if I had thought of it. I told my friend I was making cake balls, and she said, “you’re making cake WHAT?!” I was only embarrassed I hadn’t thought of it first.

So, cake balls, cake truffles, it’s up to you. Think of your audience. Classy? Not?

I first came across these little pups on Pioneer Woman’s blog, and was intrigued to try them for a long time. Then I hosted a birthday party, and I had a bride-to-be friend contemplating what to serve as favors for her reception. Both occasions seemed worthy of trying this out.

It looks easier than it is.

cake truffles
I made three batches of these, each getting slightly better than the last, though none turned out as good looking as they are on the blogs. The valuable lesson I learned with this was how to melt chocolate like a pro. (Dipping cake into it is another story.)

MAKE THE CAKE

To start out, you make a box mix cake in a 9×13 sheet pan. Just follow the directions on the box, nothing special here. You can use any flavor you like; Bakerella uses red velvet, and I also tried it with spice cake.

Once the cake has cooled completely, turn it out of the pan and crumble it finely in a large bowl. You can use your hands for this, a dough cutter, a potato masher, a fork, whatever. Not your teeth, or you won’t be able to proceed to the next steps…

Next step, mix in some storebought canned frosting. The original recipe calls for a whole can, but I think that’s way too much. I used 1/2 – 3/4 of cream cheese frosting for both flavors of cake. I liked the cream cheese because it’s not as sweet as white frosting would be. You’ll want to keep in mind how all these flavors are going to work together.

cake and frosting
Cover a cookie sheet or cutting board with wax paper. Once the cake and frosting are well incorporated, roll the cake into balls about 1 or 1 1/2″ diameter, then drop on wax paper and freeze at least 1 hour. Freeze, do not refrigerate.

MELTING CHOCOLATE

Next, melt chocolate over a double boiler. Here is what I learned about melting chocolate: you don’t want to get it too hot too fast, or horrible things will happen. The method that’s working for me now is to fill a small saucepan about half-way with water and bring it to a boil. Then I turn the heat down to medium-low and place a metal mixing bowl filled with chocolate on top, making sure the water doesn’t touch the bottom of the bowl. Then I hold the bowl with a ridiculously large oven mitt and stir the chocolate slowly-and-patiently with a spatula until it has all melted.

This is the perfect consistency (you will know it when you see it yourself):

melted chocolate
CHOOSING A CHOCOLATE

As for the type of chocolate you use, there are a few options out there. Chocolate bark is usually recommended for making candy, but in May, I couldn’t find it anywhere. A man at Trader Joe’s told me they carry it seasonally. When I finally did find it at WalMart, I had moved on to other things. If you try it, report back to me.

I was worried about my chocolate melting well, so I first used “expert” candy-making chocolate from Wilton.

Wilton candy melts
I have very bad memories of this stuff from my mother’s candy-making days. I’ve tasted many colored varieties, and none of them taste anything like chocolate. But since this claimed to be dark cocoa and I hadn’t seen it before, I thought I’d give it a try. It melted fine and tasted fine, but while melting it made my kitchen smell like a boy’s sweaty socks after a soccer game. Not appetizing.

So then I tried Trader Joe’s Pound Plus dark chocolate.

TJ's pount plus dark chocolate
This also melted beautifully and tasted great. In the end, it was a toss-up as to which was better – with the Wilton chocolate, I could taste the cake more. With TJ’s, I tasted the chocolate more.

Moving on…

DIPPING THE CAKE BALLS

Prepare a plate or large board with wax paper. Then take your cake balls out of the freezer, one at a time, to dip. My method eventually became dropping a ball into the chocolate and rolling it with a spoon in my left hand to coat both sides while simultaneously pushing it onto a large slotted spoon in my right hand. Then I’d tap the slotted spoon several times against the edge of the bowl to shake off any extra chocolate. (Pioneer Woman recommends using a fork, but the cake ball rolls off a fork for me. Maybe she has magical cake-ball-balancing powers.)

dipping truffles
Then I gently push the coated truffle with the first spoon onto wax paper.

truffles
You want to be very careful with the spoons, as they will easily remove the chocolate and expose cake. Perhaps ironically, the cake part of these cake truffles is what gave me the most grief. For example, let me show you why you want to dip these one at a time out of the freezer:

melted chocolate
See that? Cake bits in the chocolate. This is what happens when the cake gets too warm, and it’s not good. It can result in dipping disasters, like this:


Clumpy chocolate will also occur if the chocolate is heated too high:


I got slightly better with some of the truffles on the right here, dipped in dark chocolate. I think this was about as good as I got, sadly.


So good luck with all of that. If you’re scared, this is another cute option.

CAKE TRUFFLE CUPCAKES

Pick up some peanut butter cup molds and colored melting chocolate. You can find both in a candy supply store and I think Micheal’s carries them as well.

candymaking supplies
Melt the dark chocolate in the same way as described above, and fill each mold half-way with it. Then dip in a cake ball about half-way, to bring the chocolate to the top of the mold.

cake ball cupcakes
Let these sit to firm up, about 20 minutes, or place them in the freezer. Then melt colored chocolate. You can use any color you like; I just used white this time.


Pop the truffles out of their molds and invert, dipping the exposed cake in the colored chocolate. The color should meet the bottom. It’s best to have a deep puddle of chocolate to dip in, so I recommend using a small bowl. Lastly, you can decorate your mini cupcakes with sprinkles, nuts, M&Ms, etc.

cake ball cupcakes
These didn’t turn out as cute as Bakerella’s, either. And frankly, I don’t like them as much as the regular truffles. The solid chocolate bottom makes them a bit awkward to eat, as it breaks when you bite into it. Hard chocolate, soft cake. But if you’re throwing a party, these do make a nice presentation.

While you still have some colored chocolate melted, you can put it in a pastry bag with a fine tip to decorate your earlier, disastrous cake truffle attempts. These are terribly ugly. I was terribly tired and apathetic by this point. But… ehhh… you get the idea?


The good thing I have to say about these truffles is they are fun, different, and people really love them. I served them at David’s birthday party, and unadorned and sweating as they were, my guests practically inhaled them, then gushed at how good they were while licking melty chocolate off their fingers. So if you’re not a perfectionist, or if you are, and if you have some free time on your hands, try these out. And good luck to you.

Party time!

8 Jun

I love throwing parties. Really, really love it. Always kill myself doing it  – but love it anyway. I also happen to love David, and this past weekend was his birthday, so about two dozen friends and I got together and, after a couple months of planning and a very elaborate network of lies, we surprised him with a swingin’ party!

I’m not posting how-to’s for the individual recipes this time, but here are the details, in case you could use some inspiration for your next party. I wish I had gotten more pictures of the food, but alas… it was hectic. I would never have been ready on time if not for the great group of people who showed up early to help me with the last-minute prep. I kept apologizing to them and saying, “One of these days, I’m going to throw a party and have everything ready when people get here!!” They just shook their heads, smiled, and said “No you won’t.” Oh well.

Rat Pack

I decided to give the party a Rat Pack theme, because, well – who knew how to party better than the Rat Pack? Plus we love the music and the whole era. I had so much fun researching cocktail parties and getting into a retro mindset. I watched Mad Men, shopped garage sales and antique stores, and watched a bazillion instructional YouTube videos on vintage hair & makeup.

streamers

The lie:

Faux event created by my friend Jen – co-ed happy hour to celebrate her upcoming wedding. The wine bar was near my house, so he came over to meet me and we would go together. Psych!

surprise birthday party

The menu:

Pigs in a blanket (meat and tofu dogs in Pillsbury Crescent Roll dough)
Chips and homemade guacamole from my friend Claire
Chicken sandwiches from Daniele, David’s mother
Deviled eggs from my friend Karen
Meat / cheese / olive bites on frilled toothpicks
Spiced nuts
Waldorf salad from Rachael Ray
Popcorn from a vintagey popcorn maker David’s parents brought over
Mini cupcakes and cake balls in red velvet and spice cake
Chocolate mocha cake from Ina Garten
Retro candies
Martinis
Cardinal punch

spiced nuts & mini cupcakes

birthday cake

birthday cake

Decorations:

Streamers
Poker table
Food label tent cards
Slide show with pictures of Rat Pack, Mad Men, pin-up girls, etc.

Swingin’ playlist:

Rat Pack members Frank Sinatra, Dean Martin & Sammy Davis Jr.
Ella Fitzgerald
Louis Prima
Louis Armstrong
Peggy Lee
Brian Setzer Orchestra
Squirrel Nut Zippers
and others… great for a theme party, but this also happens to be the soundtrack to my everyday life 🙂

Games:

Mad Men-inspired advertising slogan quiz (from this list)
Charades – famous movie titles from the 1960s and earlier

quiz & paper airplaneThe slogan game was later turned into paper airplanes… my friends are such clever recyclers!

A couple signs of success from the next day…

The carnage was worse than any other party I’ve thrown. Most notable was the flattened popcorn all over the floor. The chocolate shavings (and guts thereof) were fun too!

When I resumed the five and a half-hour party playlist the next day, only two songs were left unplayed.

All the alcohol left in my fridge and freezer was a bonus. 😉

I ended up starting a cold before the party even ended, which I am still fighting four days later. BUT it was all worth it, and so much fun we are already thinking about the next party! Woohoo!

Anne Taintor