Tag Archives: favorites

Tarte Aux Pommes (Apple Tart)

15 Nov

Good apple pies are a considerable part of our domestic happiness.
~Jane Austen

French apple tart

Recipe source: David / Daniele

Today I want to share a very special recipe for classic French apple tart. This is a simple, elegant dessert where the fruit really shines – it has only a few ingredients, and little to no refined sugar. The basic recipe lends itself to a lot of creativity, with all kinds of options for jam and fruit. I really like apples because they’re not so juicy that they make the crust soggy. And since Fall is apple season, they’re plentiful!

. . . . . . . . . . . . . . . . . . . . . . . . . . . . .

But before we bake…

Besides the obvious – deliciousness – I have another reason to get your mind on pie: the Mama’s Pie in the Sky Bake Sale.

If you live in San Diego, this annual fundraiser is just the thing to round out your Thanksgiving meal! Skip the Vons bakery and help out a good cause.

Mama's Pie in the SkyFrom the press release:
Dozens of San Diego County top chefs, caterers and bakers will lovingly prepare thousands of pies to raise much-needed funds for Mama’s Kitchen. The Mama’s Pie in the Sky Bake Sale is a Thanksgiving tradition, and is considered to be the west coast’s largest bake sale. Each $20 pie provides more than six home-delivered meals to a neighbor struggling with a critical illness such as cancer or HIV/AIDS.

All proceeds from pie sales go directly into funding thousands of free, hot and nutritious Mama’s Kitchen meals, which help ensure that no one living with AIDS or cancer will go hungry in the San Diego community.

Mama’s Kitchen hopes to sell more than 6,250 pies before Nov. 20, which will raise $125,000 and fund nearly 40,000 meals. With the rising cost of food purchased to prepare the meals delivered by volunteers to hundreds of men, women and children in San Diego County, the funds raised through the Mama’s Pie in the Sky fundraiser are needed more than ever.

Here’s how Mama’s Pie in the Sky works:

1. Visit www.mamaspies.org to purchase the Thanksgiving pies of your choice: apple, pumpkin, pecan, or no sugar added apple pies. If you have a friend or colleague selling pies, choose their name. Otherwise you can just purchase from Mama’s Kitchen directly.

2. Select a convenient pick-up location. The pies will be available for pick-up at one of 19 Wells Fargo Bank branches throughout San Diego County or at Mama’s Kitchen, located at 3960 Home Avenue, San Diego, Calif. 92115.

3. Go to the location you selected on Wed., Nov. 23 between 10 a.m. and 4 p.m. to pick up your pie(s) from one of our volunteers. When you open your pie, you’ll discover what baker prepared your pie.

4. To purchase a pie that will be hand-delivered to Mama’s Kitchen’s clients on Thanksgiving morning, select the “Love-A-Client” option. For every “Love-A-Client” pie purchased, the donor will receive an entry to win a 64MB iPad2.

There is still time to sell pies this year. Mama’s Kitchen is looking for individuals and groups to form teams to sell pies before Nov. 20. Volunteers also have opportunities to win prizes from generous sponsors. To sign up to sell pies, visit www.mamaspies.org.

But don’t just take my word for it! Here’s a little message from Sam “The Cooking Guy” Zien and Elizabeth Harris of Elizabethan Desserts –

The last day to purchase the handcrafted pies is Nov. 20, 2011. Fifteen dollars from each $20 pie sale is tax-deductible. Pies can be purchased online at www.mamaspies.org or by calling (619) 233-6262.

. . . . . . . . . . . . . . . . . . . . . . . . . . . . .

OK! Back to the blog…

If you’ve been reading this blog for a while, you might know that I’m a big fan of homemade pastry crust. That is largely thanks to David, who taught me this recipe. So I thought it would be appropriate to pass on a few crust-making tips from the pro:
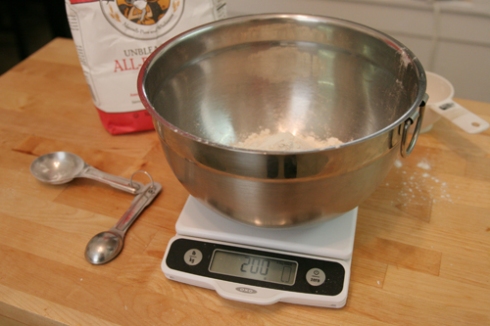
kitchen scaleThe scale! An essential kitchen item.

The perfect weights for this pastry dough are 200 grams of all-purpose flour, 100 grams of cold unsalted butter, and 100 grams of ice-cold water. This will make crust for an 11-inch tart. But if you insist on cheating, this was about 2 cups + 3 tablespoons flour, 1/2 cup minus 1 tablespoon butter, and just under 1/2 cup of water.

Probably, the best way to make a pastry dough is the old-fashioned way: working the cold butter into the flour, rolling it until the butter turns into thin sheets of flaky pastry goodness, then carefully and gradually working in a bit of ice-cold water. But the fastest way is in the food processor.

However you bring your crust together (don’t worry, more help below), you’ll want to turn it out on a sheet of plastic wrap, form into a disc, and freeze for at least an hour. You can see here that chunks of butter are still intact – a good thing!

wrapped pastry dough

Skipping ahead (okay, so I’m not actually in the mood to give tips tonight – check out this earlier post for step-by-step instructions!)… once your crust is in the tart pan and pre-baked, it’s on to the fun part! The filling. The base of this tart is traditionally a fruit spread, and you can use any kind you like: apricot or blackberry, pumpkin butter, or maybe even Nutella.

confiture collage

This time, I used the Bonne Maman chestnut creme I brought back from a summer trip to France. Unfortunately, it’s nearly impossible to find in the U.S.

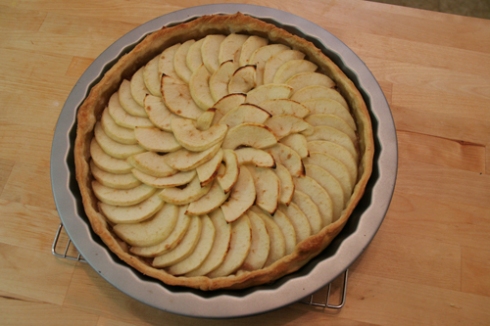
You only need a thin spread (about 2 tablespoons), then you will commence layering 5 peeled, cored, and thinly sliced Granny Smith apples in a pretty design, like so:

French apple tart

If you have an apple peeler corer slicer, lucky you! You’ll save the hand cramp I got after refusing to buy a fourth one. If not, just think positively about how slicing these uniformly is going to improve your knife skills.

Granny SmithLooks sweet and innocent, right?

It can be nice at this stage to sprinkle a layer of sugar over the top of the apples before baking. Or, you can brush a light coating of light-colored jam (such as apricot) or maple syrup over the top while it’s still hot from the oven.

sugared apples

Bake at 450 degrees F for 25-35 minutes, or until the crust is slightly brown and completely firm, and apples are desiccated. Serve warm or room temperature.

French apple tart

Recipe – Tarte Aux Pommes (Apple Tart)

200 grams all-purpose flour
100 grams cold unsalted butter
100 grams ice-cold water
1 teaspoon sugar, optional
1/4 teaspoon cinnamon
1/4 teaspoon salt
2 tablespoons fruit spread of your choice
5 Granny Smith apples
2 teaspoons granulated sugar, optional
1 teaspoon nutmeg, optional

To make the dough, sift and weigh 200 grams of all-purpose flour into a large bowl, stir in sugar, cinnamon, and salt, and cut in 100 grams of cold butter. With your hands, gradually mix in 100 grams of ice-cold water until all is well combined. (This step can be done in a food processor, but be careful not to over-process the butter at this stage.) Turn the dough out onto a cold surface and with your hands, form into a disk, wrap in cling film, and refrigerate for 30-60 minutes.

Remove dough from refrigerator and turn out onto a cold surface. Roll it to a thin round disc, fold in half and then into thirds, and wrap tightly in cling film; refrigerate for another 30 minutes.

Remove dough from refrigerator and roll it one last time, as round as possible, leaving about 1″ to go up the sides of the pan. Fold the dough in quarters and place it in a 15″ tart pan with a removable base. Unfold and press the dough into all sides, using a rolling pin to trim excess dough from the top edges of the pan. Cover the top of the dough with cling film and refrigerate until ready to assemble the tart.

Preheat oven to 450 degrees F. Peel and core apples, slice into 1/4-inch rounds, then cut in half. Remove the tart pan from the refrigerator and spread the bottom crust evenly with your preferred jam (apricot, boysenberry, or chestnut creme all work nicely).

Starting on the outer edge and moving inward, tightly overlap the apples until all slices are used. Sprinkle the entire surface with a light layer of sugar and nutmeg, if desired. (For those going sugar-free, you can brush a light layer of jam over the apples just before baking, and this will create a nice shine on the surface. I recommend St. Dalfour brand, which is only sweetened with grape juice concentrate.)

Bake immediately for 25-35 minutes, or until the crust is slightly brown and completely firm, and apples are desiccated. Serve warm or room temperature.

-apple illustration-
http://www.inkart.com/pages/food/apple.html
Flavor EXPLOSION Chickpea Salad!!

5 Oct

Laughter is brightest where food is best.
~Irish Proverb

Recipe Source: The Kitchn

Some people might worry that cooking vegan means sacrificing flavor, and to them I say, this salad will blow that theory right out of the water! It’s bursting with rich, exotic flavor from cumin seeds, red pepper flakes, garlic, and sun-dried tomatoes, then cooled with parsley and mint, and given a tangy boost from lemon juice and zest. It’s an amazing marriage of flavors that satisfies even picky, ADD palates like mine. That’s why I’ve decided to rename the recipe from the original Warm Chickpea Salad with Cumin & Garlic – boring! I’m sorry Kitchn, but that title did not give it justice.

chickpea salad

This salad keeps fine for a few days, over the course of which the flavors will continue to mingle. This is one of my all-time favorite lunches. Another nice thing about it is it’s low in sodium. The original recipe calls for flaky sea salt to taste, but I don’t find it necessary. For ovo-lacto vegetarians and omnivores, a handful of feta cheese is a nice complement and adds a bit of salty flavor, but it’s beautiful even without.

One word on ingredients – you really want to use cumin seeds here, rather than cumin powder. They are distinctly different in flavor as well as texture, and toasting them gives a richness that manages to not be overwhelming like cumin powder can sometimes be.

cumin seed & red pepper

Finally, a note on safety – be careful when pouring the chickpeas into the pan, as any residual liquid from draining them will sizzle in the pan and can burn you. I’m speaking from experience here!

I hope you love this salad as much as I do. 🙂

recipe

  Warm Chickpea Salad with Cumin & Garlic
Serves 2

2 tablespoons olive oil
1 tablespoon whole cumin seeds
1/4 teaspoon dried red pepper flakes, or to taste
3 garlic cloves, finely minced
1 (15-oz) can chickpeas (garbanzo beans), rinsed and drained
1/4 cup oil-packed sun-dried tomatoes, drained and finely chopped
1/4 cup Italian parsley, leaves only
4-6 fresh mint leaves
1/2 lemon, zested and juiced
1/2 English cucumber
1/4 cup feta cheese, optional

Heat the olive oil in a heavy skillet (cast iron is nice) over medium heat. When the oil is hot, add the cumin seeds and crushed red pepper and cook over medium heat, stirring constantly, for about one minute or until the seeds are toasted. The cumin will turn slightly darker in color, and smell toasty.

Turn the heat to medium low and add the garlic. Cook, stirringly frequently, for about three minutes or until the garlic is turning golden. Do not let it scorch or turn brown.

Add the drained chickpeas and the chopped tomatoes and turn the heat up to medium high. Cook, stirring frequently, until the chickpeas are warmed through and are shiny with oil. Turn off the heat.

Strip any remaining stems away from the Italian parsley. Finely mince the parsley and the mint and toss this with the chickpeas. Stir the lemon juice and zest into the chickpeas.

Peel the cucumber and cut it in half lengthwise. Scrape out (and discard) the seeds with the tip of a teaspoon or grapefruit spoon. Dice the cucumber into small, 1/2-inch square cubes. Toss the cucumber with the chickpeas. Stir in feta cheese, if using, and taste.

Refrigerate for at least an hour before eating. This salad is best after it has had a chance to sit overnight in the fridge, letting its spices and juices soak together into more than the sum of its parts. Serve slightly warm or room temperature. Really good at any temperature, actually.

Supermoist Carrot Cake with Allspice Cream Cheese Frosting

3 Aug

Everything I eat has been proved by some doctor
or other to be a deadly poison, and everything
I don’t eat has been proved to be
indispensable for life. But I go marching on.

~George Bernard Shaw

Recipe Source: Cake adapted from my friend Lori’s college friend, Kristen
Frosting adapted from allrecipes.com

carrot cakeomg!

I’m a big fan of sweets – really. Sweets of all kinds, especially bready ones like cakes. But I’ve never really been a fan of carrot cake. I often find it a little dense and oily, and the frosting is entirely too sweet. But this recipe I got from one of my best friends, whose taste I trust, and who famously made this cake without carrots once, by accident. She assured me that even then, the cake turned out delicious! So with a review like that, I had to try it.

carrot cake batterDon’t forget the carrots!

I’ve made this cake four times now, always for a crowd, and I think I’ve perfected it. The taste has always been wonderful, but originally, it called for 1 1/2 cups of oil. I lined my pan with wax paper to make the cake easier to remove, and the oil seeped around and under the paper, it was so oily. So I worked to cut down the oil each time, first using half oil and half plain applesauce (3/4 cups each), then cutting the oil down to 1/2 cup, with 3/4 cups applesauce. And eureka – it’s wonderful!

sifting powdered sugarSift the powdered sugar into the frosting for the smoothest consistency

This cake comes out tall and spongy. It’s still super moist from all the carrots, and their flavor shines without the thick masking taste of the oil. The applesauce lends a bit of sweetness as well. Then I add in a little allspice to play with the cinnamon, since I top the cake with an allspice cream cheese frosting. I always cut the powdered sugar in half from the original frosting recipe, which makes it a tiny bit runnier than, say, a buttercream, but it’s loads better for you. Of course this cake is still far from diet food, but it weighs a little less heavy on my conscience with these adjustments! (bad puns, I shamefully admit, are fully intended)

frosting the cake*PLOP*

RECIPE – Supermoist Carrot Cake with Allspice Cream Cheese Frosting

Cake
2 cups sugar
1/2 cup canola oil
3/4 cup unsweetened applesauce
4 eggs
2 cups flour
2 teaspoons baking soda
1 teaspoon salt
2 teaspoons cinnamon
1 teaspoon allspice
3 cups (1 lb) grated carrots

Allspice Cream Cheese Frosting
1 (8 ounce) package cream cheese, softened
1/3 cup butter, softened
3/4 teaspoon ground allspice
2-3 cups confectioners’ sugar
1 teaspoon vanilla extract
2 tablespoons milk

Make the cake
Mix sugar, oil and applesauce, and beat, adding 1 egg at a time. Mix till fluffy.

Combine flour, baking soda, salt, cinnamon and allspice in a separate bowl.

Mix dry ingredients with wet ingredients.

Add carrots and mix well.

Bake in ungreased 9×13 pan (or two 10” rounds) at 350 degrees F for 20-30 minutes. Let cool.

Make the frosting
In a medium bowl, blend the cream cheese, butter, and allspice.

Gradually mix in the confectioners’ sugar, vanilla, and milk until the mixture is spreadable.

Optional: sprinkle frosted cake with chopped walnuts.

Updated: Almost Tandoori Chicken

16 Apr

** Update: now that I’ve been blogging for a year, I thought it was time to improve the shabby photos on my first post. As my photography skills improve, and/or I run out of new ideas, it’s possible this post will recycle itself yet again! So if you missed this recipe the first time around, I hope you enjoy it. **

. . . . . . . . . . . . . . . . . . . . . . . . . . . . . . . . . . . . . . . . . . . . . . . . . . . . . . . . . . . . . . . . . . .

Recipe Source: Adapted from Rachael Ray

This recipe is “ala Jen” primarily because of mistakes. The first time I made it, I did not have turmeric, so I used garam masala* instead, figuring something along the lines of “it’s Indian, it will work.” Also, in the course of halving the recipe, I forgot to halve the measurement for cumin. But I was still really happy with the result.

The second time I made it, I followed the recipe to a tee and didn’t like it as much. So what I’m giving you here is my version, including turmeric and garam masala, and twice the amount of cumin RR thinks is fittin’. I tend to be a fan of spices in general. But I guess the moral of the story is, you can’t really mess up this recipe. And don’t worry – it has a lot of spices, but it is not spice-y.

The recipe calls for chicken thighs, but I have used breasts in a pinch and they work fine. First, you’ll be making a yogurt-spice mixture to coat the chicken. I wouldn’t recommend substituting regular yogurt for the Greek, as the texture of Greek is just… well, phenomenal. It’s thick and will cling to your chicken like this recipe will cling to your thighs. (No, not really!) If you have a Trader Joe’s near you, you can pick up the yogurt as well as the naan I’m going to talk about later. To zest the lime, you can use a cheese grater or a microplane grater. I just got my microplane and I’m loving it!

turmeric, cumin, coriander, lime zest et. al.

Coat the chicken in the yogurt mixture, then roast it on a rack in a preheated 500 degree F oven. Since I don’t own a roasting rack, I put a cooling sheet over a foil-lined cake pan, like this! Like a charm.

yogurty marinated chickeny bits of goodness

While the chicken is cooking, you can prepare the apple-tomato topping. This topping might seem improbable, but trust me, it is perfect. So, sooo perfectly wonderful with this chicken. I like to use my trusty apple-peeler-corer-slicer for this task.

apples & tomatoes

To serve, I like this with a dressed-up naan from Trader Joe’s. I like to buy their whole wheat naan, or if that’s not available, multigrain. Then I brush the top with olive oil, some fresh minced garlic and fresh cilantro, and toast at 350 degrees F for about 5-10 mins. Ahhh, heaven.

Rachael Ray's Almost Tandoori Chicken

RECIPE – Almost Tandoori Chicken

1 cup Greek yogurt
1 tablespoon turmeric
1 tablespoon coriander
1 tablespoon smoked paprika
1 tablespoon ground cumin
1 tablespoon garam masala
1 teaspoon ground cardamom
1 lime, zested and juiced
2 pounds skinless, boneless chicken thighs
Salt and freshly ground black pepper
2 green apples, peeled, cored and thinly sliced into matchsticks
3 plum tomatoes, seeded and very thinly sliced lengthwise
3 tablespoons cilantro, finely chopped
2 tablespoons olive or vegetable oil
4 pieces naan bread, plain or flavored, store-bought, warmed

Preheat oven to 500 degrees F.

Combine the yogurt with the spices and zest of lime in a large bowl.

Cut the chicken into large chunks and season liberally with salt and pepper. Add to the yogurt mixture and toss to coat evenly. Put a small wire rack on a baking sheet or a slotted broiler pan. Arrange the chicken on the rack or slotted pan and roast until charred at the edges and juices run clear, about 15 minutes.

Combine the apple, tomatoes and scallions in a serving bowl. Add the lime juice, oil, and salt and pepper, to taste, and toss to combine.

Transfer the chicken to a serving platter and serve with apple-tomato topping and warm bread.

Serves 4.

*If you can’t find garam masala, you can make it yourself using this recipe. San Diegans, I recommend buying it in bulk at Henry’s – you can get a small amount for a small price, then decide if you need to buy more. Black Mountain Road, off Miramar, also has some great Indian markets!

Celebrating one year of the blog (and Earl Gray teacookies)

18 Mar

Recipe source: The Kitchn

On this day last year, I unceremoniously published my first post on Spork, with no introduction, no mission statement, and very little notice to family and friends. I had just lost my job and had time on my hands. The photo quality was horrible and the layout was wordpress default. I wasn’t sure where I was going with this or how long my newfound hobby would last.

And over the past year, this blog has inspired me in so many ways. I’ve been driven to improve the quality of my photography (and photoshop skills – with a long way to go), and been drawn to books and the example of other blogs on food presentation. I’ve loved the challenge of posting a variety of recipes, and planned my own meals around what I think the blog could use. Through the “veg week” theme, I learned to have a more plant-friendly mindset, and have decreased my consumption of animal products ever since.

As I discovered gorgeous new food blogs on a near-daily basis and connected with other bloggers on twitter, a whole world of food enthusiasts unfolded before me. I’ve been inspired by the passion and creativity I’ve seen on these other sites, and how a lot of these bloggers are making a living sharing their love of food with the world.

I still feel that I am but a small blogger, with a free wordpress account, hardly known amid the sea of cooking content on the web. But I love my little hobby nonetheless, and I’m so grateful for all the feedback I have received – from friends in person, from comments on facebook, from my grandmother who is my #1 fan, and from the occasional stranger who finds me on twitter.

Earl Gray teacookies

So in the spirit of Spring and renewal, here is a recipe for a teacookie I love, from one of my favorite cooking blogs. This is called an ‘icebox cookie’ because you can freeze the dough and cut off just as much as you want to bake at any time. It’s a great way to have fresh cookies without having 42 fresh cookies, all by yourself. 🙂

Earl Gray tea

You can make this recipe with any type of tea you like, but I really enjoy the citrusy flavor of Earl Gray that shines through this cookie. In her notes, Ms. Durand recommends using the tea from teabags rather than loose-leaf, saying that it’s surprisingly more flavorful.

food processor cookie dough

The dough takes about two minutes to whip up in the food processor – score!

Earl Gray cookie dough

Once the dough has a nice, crumbly texture, you will turn it out on a sheet of wax or parchment paper and form it into a log. Chill for at least 30 minutes, or until you are ready to bake. The cookies will crisp up beautifully in a 375-degree oven after about 12 minutes.

I'm a little teapot, short and stout :)

Enjoy with a piping hot cup of tea. Hmmm… I wonder what flavor you’ll choose?

RECIPE – Earl Grey Tea Cookies
makes 2 dozen

1 cup all purpose flour
1/4 cup sugar
1/4 cup confectioners’ sugar
1 tablespoon Earl Grey tea leaves*
1/4 teaspoon salt
1/2 teaspoon vanilla
1 teaspoon water
1/2 cup unsalted butter

Preheat oven to 375°F. Pulse together all the dry ingredients in a food processor until the tea leaves are pulverized.

Add vanilla, water, and butter. Pulse together until a dough is formed. Form the dough into a log onto a piece of wax or parchment paper. Wrap the paper around and roll the log smooth. Freeze now, or chill for at least 30 minutes.
When chilled, slice the log into 1/3 inch thick pieces. Place on baking sheets and bake until the edges are just brown, about 12 minutes. Let cool on sheets for 5 minutes, then transfer to wire racks.

*One would think that expensive loose leaf tea would be best in this recipe. But I’ve actually gotten the best flavor with tea from cheap bags that I’ve ripped open. I think the leaves are more fine and flaky.

Spaghetti with Artichoke Hearts & Tomatoes

29 Dec

Recipe Source: Pioneer Woman

This recipe defines comfort food for me, and is incredibly easy to make. So easy that the Pioneer Woman admitted to embarrassment for posting it on her blog – but I have no such shame! This is what she calls a “pantry recipe,” meaning that you quite likely already have all or most of its ingredients in your pantry.

The combination of creamy and tart flavors is what I think really makes this dish. To start, you will cook a pound of spaghetti in a pot of slightly oiled, salted water according to package directions.

While you’re waiting for the pasta water to boil, melt butter and olive oil in a large saucepan and saute onion and garlic until they become fragrant, a few minutes. Then add in a can of drained, non-marinated artichoke hearts.

drained artichoke hearts

I like to break them up with my hands a bit to disperse them through the entire dish. Next add in a can of diced tomatoes, with their juice, and simmer for about 10 minutes.

canned tomats

Reduce heat and pour in heavy cream and broth. The original recipe doesn’t call for meat, but if you’d like some chicken, you can add a cooked, diced breast at this point to heat through. In general, I like to use chicken stock when I’m cooking with chicken, and vegetable stock for fully vegetarian, non-meat dishes. I don’t think this is really a “rule” that exists anywhere, but it’s my personal rule as I’ve come to appreciate vegetarian meals more. To season, fresh-grated nutmeg adds a special twist (or dried ground is fine too) in addition to salt and pepper.

parmesan-asiago cheese blend

The last step in this recipe is to douse it with grated parmesan cheese. Surprisingly, on the day I went shopping, a flaky parmesan-and-asiago blend was more affordable, so I used it instead. The blend achieved a gooey-melty-cheesy fabulousness that I don’t remember getting with the grated stuff, so I think I’ll make it a staple in the future. It’s also nice to serve on your side salad.

Just before serving, top with diced chives or another fresh green herb of your choice and enjoy!

Spaghetti with Artichoke Hearts & Tomatoes

RECIPE – Spaghetti with Artichoke Hearts & Tomatoes

2 tablespoons olive oil
2 tablespoons butter
3 cloves garlic, minced
1/2 medium onion, finely diced
1 14.5 ounce can artichoke hearts (non-marinated), drained
1 14.5 ounce can diced tomatoes with juice
1 cup heavy cream
1/2 cup chicken or vegetable broth, more as needed
1/2 teaspoon nutmeg
salt & pepper to taste
1 pound thin spaghetti
1 cup freshly grated Parmesan cheese
2 tablespoons chopped chives or other herbs

Cook spaghetti till al dente. Drain and set aside.

Melt olive oil and butter in a large skillet over medium heat. Add onions and garlic and sauté for 2 to 3 minutes. Add artichoke hearts and tomatoes. Stir and cook for 8 to 10 minutes.

Reduce heat to low. Stir in cream and broth. Add salt and pepper to taste. Sprinkle in nutmeg. Cook over low heat until heated through, then turn off heat.

Place drained pasta in a large bowl. Sprinkle with 1 cup Parmesan. Pour sauce over the top. Add chopped chives. Toss lightly to combine and coat; add a tiny bit of reserved pasta water if sauce seems too thick.

Tequila Lime Chicken & String Beans with Shallots

9 Dec

Recipe source: Barefoot Contessa Family Style

“The idea of family is behind much of what defines my cooking style. I want everyone who comes to my house to feel like family.” – Ina Garten


Today’s a twofer! And one I’m excited to post, because both of these recipes are the bomb. I was a little frazzled on the night of my cooking, so this is not a photo-heavy post, but I will update the next time I make it.

tequila - lime - chicken

First off, the marinade for this tequila lime chicken is fantastic, just the right amount of tart, and it makes the chicken very moist, especially since you leave the skin on the breast. When I was titling the above photo, I realized the acronym for this recipe is TLC – exactly what you will feel when you make it for yourself.

To make the marinade, you’ll combine tequila, lime juice, orange juice, chili powder, jalapeno pepper, cilantro, garlic, salt, and pepper in a large Tupperware container, add skin-on chicken breasts, and refrigerate overnight. Grill to blacken just slightly.

green beans w. shallots

String beans are one of many vegetables to recently become at home in my palate. I grew up positively hating them, which I now think was partly because I hated all vegetables, and partly because the ones I ate were canned. I’ll never go back to the can, but fresh string beans are a treat, especially these thin French variety, aka haricorts verts.

This is an extremely simple side dish, and blanching the string beans in advance gives them a beautiful, bright green color and loud, satisfying crunch. You can use regular string beans for this recipe as well, but I like the French variety.

After blanching the string beans, set them aside and melt butter and olive oil in a skillet. Saute shallots until they are lightly browned. I like a coarse chop on my shallots, since they’re not as intense as red or white onions. In the same pan, add the string beans and heat until they are just warm, tossing with kosher or sea salt just before serving. Note: The first time I made these, my package of string beans was half the size Ina calls for, yet I used her full portion of olive oil and butter for sauteeing. The taste was uh-maz-ing, if not the healthiest. But it might just be the trick to this dish, as I haven’t been able to bear cutting my portions down. Good thing I recently took up running.

tequila lime chicken & green beans w. shallots

RECIPE – Tequila Lime Chicken

In warm weather, this chicken flies out of Barefoot Contessa. We can buy boneless chicken breasts with the skin on, but if you can’t get them that way, just buy chicken breasts on the bone and run a sharp knife between the meat and the bone to separate them. It takes a bit of skill but the technique is easy to learn.

1/2 cup gold tequila
1 cup freshly squeezed lime juice (5 to 6 limes)
1/2 cup freshly squeezed orange juice (2 oranges)
1 tablespoon chili powder
1 tablespoon minced fresh jalapeno pepper (1 pepper seeded)
1 tablespoon minced cilantro
1 tablespoon minced fresh garlic (3 cloves)
2 teaspoons kosher salt
1 teaspoon freshly ground black pepper
3 whole (6 split) boneless chicken breasts, skin on

Combine the tequila, lime juice, orange juice, chili powder, jalapeno pepper, cilantro, garlic, salt, and pepper in a large bowl. Add the chicken breasts. Refrigerate overnight.

Heat a grill with coals and brush the rack with oil to prevent the chicken from sticking. Remove the chicken breasts from the marinade, sprinkle well with salt and pepper, and grill them skin-side down for about 5 minutes, until nicely browned. Turn the chicken and cook for another 10 minutes, until just cooked through. Remove from the grill to a plate. Cover tightly and allow to rest for 5 minutes. Serve hot or at room temperature.

Serves 6

RECIPE – String Beans with Shallots

French string beans are the slender ones you are most likely to find in specialty markets, but you can also make this with regular string beans. This recipe can be prepared almost entirely in advance. After the string beans are blanched, all you have to do is sauté the shallots in butter and toss the beans in the pan until they’re warm.

1 pound French string beans (haricots verts), ends removed
Kosher salt
2 tablespoons unsalted butter
1 tablespoon good olive oil
3 large shallots, large-diced
1/2 teaspoon freshly ground black pepper

Blanch the string beans in a large pot of boiling salted water for 1 1/2 minutes only. Drain immediately and immerse in a bowl of ice water.

Heat the butter and oil in a very large sauté pan (12-inch diameter) or large pot and sauté the shallots on medium heat for 5 to 10 minutes, tossing occasionally, until lightly browned. Drain the string beans and add to the shallots with 1/2 teaspoon salt and the pepper, tossing well. Heat only until the beans are hot.

If you’re using regular string beans, blanch them for about 3 minutes, until they’re crisp-tender.

Serves 6

Pecan Pie, two ways

26 Nov

Recipe Source (pie #1): Bon Appétit
Recipe Source (pie #2): Food and Wine

Pecan pie is a favorite at Thanksgiving, and since I made two this year, you’re getting two recipes for the price of one! The first is a tried and true favorite, made for a work potluck – toasted pecan pie with cinnamon whipped cream. The other is a new and exciting recipe for my family, scouted out by my mother, Thanksgiving hostess extraordinaire – bourbon pecan pie.

pecans

Both recipes involve toasting pecans, which brings about a different flavor than using them raw. I like this first recipe because it uses a combination of raw and toasted pecans.

chopped pecans

A key ingredient for most pecan pies (besides pecans) is corn syrup. A good amount of it – 1 to 2 cups, depending on the recipe. The point where I hear the glug-glug-glug of the corn syrup bottle is usually the point where I wish I was just blindly eating this pie, without knowing what went into it.

corn syrup

The crust for this one is a basic mixture of flour, cold butter, and water. I add in a little nutmeg for interest, but it’s probably not necessary because the filling is so rich and filling. I think I will stop wasting my nutmeg in the future. 🙂 Although the recipe doesn’t call for pre-baking this crust, it can’t hurt – this year my filling oozed through the crust and made it difficult to remove from the pie dish.

toasted pecan pie

This second pie has *just enough* bourbon to give interest and a little a grown-up guilty pleasure. For example, you can tell the kids in your family to back off, because this pie has alcohol and it’s for adults only!!! If you’re evil that way, I mean. Not that I know anybody who would do that.

Jim Beam bourbon

I decided to follow this recipe faithfully the first time, because it was new, so now I can say with confidence that this crust recipe is wacked out. For one thing, I would not spend the money or effort on scraping fresh vanilla bean for the crust, because you can’t taste it anyway. It might be a great idea for a simple custard filling, but for pecan pie, no. I have also never seen a pie crust involving powdered sugar. This dough was very sticky to handle, and the filling oozed out of the tart pan (sad face). So next time, I’ll stick with the crust recipe for pie #1. I liked the size and shape of the tart pan vs. my 9″ glass pie dish though, so the jury is still out on that one… as long as the tart pan is placed on a cookie sheet, it will catch the ooze. And surprisingly, I was able to lift the bottom out of the pan with no problems.

pecan pie filling

All in all, I loved the filling for this pie. It uses less corn syrup, fewer eggs, and brown sugar vs. white. The heavy cream is an interesting addition that is supposed to give a custard-like texture, although it didn’t seem that way to me. My original idea for the decoration was to stack pecans all around the top, like this, but as soon as I started I realized 11″ diameter is big! So I lined the outer edge and stopped there. I was really happy with the end result. This is an elegant tart and highly recommended, with a few modifications.

bourbon pecan tart

Happy Thanksgiving, everyone!


bourbon pecan tart slice

RECIPE #1 – Toasted Pecan Pie

FILLING
3 cup pecans (about 10 oz), divided
6 large eggs
2 cup sugar
2 cup dark corn syrup
1/4 cup (1/2 stick) unsalted better, melted
1 tablespoon vanilla extract
1/4 tsp salt
CRUST
1 1/3 cup all-purpose flour
1/2 tsp salt
1/2 cup (1 stick) chilled unsalted butter, cut into 1/2-inch cubes
4 tablespoons (or more) ice water
WHIPPED CREAM
1/2 cup heavy whipping cream
1 tablespoon sugar
1/4 teaspoon cinnamon

Preheat oven to 350º

MAKE THE CRUST: Blend flour and salt in processor 10 seconds. Add butter; cut in using on/off turns until mixture resembles coarse meal. Add 4 tablespoons ice water; blend just until moist clumps form, adding more ice water by teaspoonfuls if mixture is dry. Gather dough into ball; flatten into disk.

Wrap in plastic; chill 1 hour. (Can be made 2 days ahead. Keep chilled. Soften slightly at room temperature before rolling out.)

MEANWHILE, MAKE THE FILLING: Coarsely chop 2 cups pecans and reserve. Spread 1 cup pecans on rimmed baking sheet. Toast in oven until nuts are aromatic and darker in color, about 12 minutes. Cool, then grind nuts finely in processor. Maintain oven temperature. Roll out crust on lightly floured surface to 13-inch round (crust will be thin).

Transfer crust to 10-inch-diameter pie dish. Fold overhang under, forming high-standing rim. Crimp edges decoratively. Freeze crust 20 minutes.

Whisk eggs in large bowl until frothy. Add sugar, corn syrup, melted butter, vanilla, salt, and ground toasted pecans; whisk until blended. Mix in chopped pecans. Pour filling into crust. Bake pie until crust is golden and filling is puffed and set (center may still move when dish is shaken), about 1 hour 10 minutes. Transfer to rack and cool at least 3 hours. (Can be prepared 8 hours ahead. Let stand at room temperature.)

MAKE THE WHIPPED CREAM: In a bowl, using an electric mixer, beat the cream, sugar and cinnamon until stiff peaks form. Cut the pie into wedges and serve with the whipped cream.

Cut pie into wedges and serve slightly warm or at room temperature with whipped cream.

RECIPE #2 – Toasted Pecan Tart with Bourbon Whipped Cream

CRUST
1 1/2 sticks unsalted butter, at room temperature
1 1/4 cups all-purpose flour, plus more for rolling
1/3 cup plus 1 tablespoon confectioners’ sugar
1/2 teaspoon salt
1/2 vanilla bean, seeds scraped
1 large egg white
FILLING
2 cups pecan halves
1 cup light corn syrup
1/2 cup light brown sugar
1/2 cup heavy cream
3 large eggs
1 tablespoon bourbon
1 teaspoon pure vanilla extract
1/4 teaspoon salt
2 tablespoons melted butter
WHIPPED CREAM
1 1/4 cups heavy cream
2 tablespoons confectioners’ sugar
1 tablespoon bourbon

MAKE THE CRUST: In a bowl of a standing mixer fitted with the paddle, beat the butter until creamy. Add the 1 1/4 cups of flour and the confectioners’ sugar, salt and vanilla seeds and beat at low speed until smooth. Beat in the egg white. Scrape the dough onto a sheet of plastic wrap; press into a 6-inch disk. Wrap up and freeze until firm, at least 20 minutes.

Preheat the oven to 350°. On a well-floured work surface, roll the dough out to a 12-inch round. Ease the dough into an 11-inch fluted tart pan with a removable bottom; press it into the pan. Trim the overhanging dough and use it to patch any tears or holes. Freeze the tart shell just until firm, 10 minutes.

Line the dough with parchment paper and pie weights and bake for 20 minutes, until nearly set. Remove the weights and paper and bake for 20 minutes, until golden.

MEANWHILE, MAKE THE FILLING: Spread the pecans on a baking sheet and toast for 10 minutes, until fragrant. Let cool, then chop the nuts. In a bowl, whisk the corn syrup, brown sugar, cream, eggs, bourbon, vanilla and salt. Stir in the butter and pecans.

Set the tart pan on the baking sheet and set it in the oven. Scrape the filling into the tart shell and bake for about 35 minutes, until the custard is set and puffed; cover the edge with strips of foil if it’s browning too fast. Transfer to a rack to cool, then remove the ring and slide the tart onto a serving plate.

MAKE THE WHIPPED CREAM: In a bowl, using an electric mixer, beat the cream with the confectioners’ sugar and bourbon until stiff peaks form. Cut the tart into wedges and serve with the whipped cream.

Pumpkin Bread

24 Sep

Vegetables are a must on a diet. I suggest carrot cake, zucchini bread, and pumpkin pie.
~Jim Davis

Recipe Source: bread – online somewhere, years ago / frosting – allrecipes.com

I love the fall, and some years (including this one), my birthday lands on the first day. I love all things Fall – leaves turning color and the concept of change that they represent, crisp cool air, and spice and pumpkinstuff everywhere. So every fall, I make homemade pumpkin bread.

pumpkin bread

At first, my mom made it from a box mix. But when I moved, I couldn’t find the mix, and eventually I wasn’t satisfied to wait for the extra loaves she made me when I visited. I searched online and ended up settling on this recipe. I’ve made it in loaves and muffins, and frosted muffins to make cupcakes.

pumpkin muffin

Often, I like to buy decorative mini loaf pans at Michael’s ($1!) and give them as gifts to co-workers and friends. Since Fall gets jilted by everyone thinking Winter starts the day after Thanksgiving, I like to make a special effort to celebrate this season.

 mini loaf pan

RECIPE – Pumpkin Bread

3 ½ cups all-purpose flour
2 tsp baking soda
2 tsp salt
1 tsp baking powder
1 tsp ground nutmeg
1 tsp ground allspice
1 tsp ground cinnamon
½ tsp ground cloves
3 cups white sugar
1 cup canola oil
2 cups solid pack pumpkin puree
4 eggs, beaten

Preheat oven to 350°F. Grease two loaf pans.

In a medium mixing bowl, combine flour, baking soda, salt, baking powder, nutmeg, allspice, cinnamon and cloves.

In a large bowl with an electric mixer, blend sugar, oil and eggs. Stir in pumpkin. Slowly blend the flour mixture into pumpkin mixture. Pour the batter into two prepared loaf pans.

Bake for about 60 minutes. Let cool for 10 minutes before removing from the pans.

pumpkin cupcake

And since I mentioned cupcakes, I will suggest a frosting. You didn’t think I would be so cruel as to overlook frosting, did you?

RECIPE – Allspice cream cheese frosting

1 (8 oz) package cream cheese, softened
1/3 cup butter, softened
3/4 teaspoon ground allspice
4 cups confectioners’ sugar
1 teaspoon vanilla extract
2 tablespoons milk

In a medium bowl, blend the cream cheese, butter, and allspice.

Gradually mix in the confectioners’ sugar, vanilla, and milk until the mixture is spreadable.

Carrot Halwa (Gajar Halwa)

18 Aug

Recipe source: La Fuji Mama

A couple months back, I found the good fortune of finding this blog, and this recipe on it. It is now a favorite I will be making often, as well as taking to parties, as many won’t know it.

This recipe is slightly time-consuming, but ultimately easy. You start with carrots…


The original recipe makes a huge portion and calls for 2 lbs of carrots. I halved it for just myself, so this is 1 lb of carrots. The first thing to do is grate them. You can use the large holes of a cheese grater for this task. Or…

I would like to take this opportunity to mention my lovely food processor, which is the bees knees. Look at this! It grates carrots. SO worth the few dishes of cleanup afterward. It may be hard to tell, but this is an “action shot,” for which I went to the trouble of setting up my camera on a stack of books, with the self-timer feature… I love my food processor just that much.


Look at this beautiful pile of grated carrots!


Dump these along with some milk into a large pot or pan with sides. This will get cooked down on medium heat until most of the milk is gone (about 30 minutes). Although Fuji Mama’s recipe says the carrots soak up the milk, I’m not fully convinced this happens… it is more likely the milk evaporting, which seems like a waste to me. The second time I made this, I cut back on the amount of milk, from 4 cups to 3. I could probably cut it down even more. But I do have a suggestion for what to do with the extra milk, which I’ll come back to.

In the meantime, I suggest you make your ghee (or begin gently warming it). My second time around with this recipe I decided to make proper ghee, since
1) I can’t find it at the grocery store nearby
2) I made clarified butter last time (which I suspect is cheating)
and 3) my mom sent me this recipe.


In the process, I learned that ghee is definitely NOT the same as clarified butter or oil. It’s brown and has a wonderfully rich, carmely taste. Although the halwa only calls for 3 tablespoons of ghee, I made the ghee with a whole stick of butter. The ghee will keep in a jar for a month, and supposedly does not need to be refrigerated, although I’m a chicken and refrigerated mine anyway… I’m looking forward to using it in other things, maybe even sauteeing veggies with it. In short, do yourself a favor and MAKE THIS.


This is what I got after straining. My Indian friends reading this blog and kindly confirm if it is, in fact, ghee. I think it is?! A word of advice – strain with cheesecloth. My seive was not fine enough, though I don’t mind the small brown bits too much.


As the milk in the carrots evaporates, the carrots will get a slightly dessicated, toasty look to them, but they should not brown. When most of the milk is gone – or you lose patience – add dry milk powder, sugar, and cardamom seeds. (I have to admit, this recipe makes me very excited to use up this huge box of powdered milk I acquired when trying my hand at another Indian dessert, gulab jamun.)  I used half the sugar of the original recipe in this halwa and liked it that way (the 1 cup measurement below is half). So start small and add to taste if you don’t have a huge sweet tooth.


For those who are thinking of substituting ground cardamom for seeds, do if you must, but… I have tried this with both, and the difference was remarkable. The seeds give this dish a bite that can’t be beat! The ground stuff really does not compare. (San Diegans, you can buy pods or seeds in bulk at Henry’s.) The downside to using seeds is that biting into them is a bit like biting into a peppercorn – not my favorite thing in the world. It might work to freshly grind them in a coffee maker… they are pretty impervious to a mortar and pestle… I might keep working on this one. But trust me, use the seeds.

Let the carrots, dry milk powder, sugar and cardamom simmer for 5 minutes, then remove from heat. Taste and add more sugar and cardamom as desired. If your carrots are still very liquidy, strain them into a bowl to save for later. This liquid is delicious mixed with yogurt for a light smoothie. Immediately add warm ghee to the carrot mixture and return to heat for a few minutes, mixing all ingredients together to lightly brown.

To serve, remove from heat and garnish with chopped nuts (usually pistachios, cashews or almonds). Carrot halwa can be served in a bowl or pressed into a mold and shaped. Serve warm.


RECIPE – Nirvana’s Carrot Halwa

Makes 8-10 servings

2 pounds grated carrots
3 cups milk
1 cup granulated sugar, or more to taste
1 2/3 cup dry powdered milk
1 teaspoon cardamom seeds
3 tablespoons ghee
Optional: Cashews or crushed pistachios for garnish.

1. Put the carrots and milk in a large pot and bring to a boil over medium heat, and then reduce the heat to medium-low.  Cook, stirring frequently until the milk is absorbed into the carrots.

2. Add the sugar, dry powdered milk, and cardamom seeds to the pot.  Stir everything together and cook the mixture for 5 minutes, then remove from the heat, and set aside.

3. In a large frying pan, heat the ghee over high heat, then add the carrot mixture.  Cook and stir until the mixture turns a golden brown, then remove it from the heat and serve.  The halwa can be served in bowls, or pressed into a mold to be shaped.  Optional: cashews or crushed pistachios can be used as a garnish.