Tag Archives: fall-winter

Tarte Aux Pommes (Apple Tart)

15 Nov

Good apple pies are a considerable part of our domestic happiness.
~Jane Austen

French apple tart

Recipe source: David / Daniele

Today I want to share a very special recipe for classic French apple tart. This is a simple, elegant dessert where the fruit really shines – it has only a few ingredients, and little to no refined sugar. The basic recipe lends itself to a lot of creativity, with all kinds of options for jam and fruit. I really like apples because they’re not so juicy that they make the crust soggy. And since Fall is apple season, they’re plentiful!

. . . . . . . . . . . . . . . . . . . . . . . . . . . . .

But before we bake…

Besides the obvious – deliciousness – I have another reason to get your mind on pie: the Mama’s Pie in the Sky Bake Sale.

If you live in San Diego, this annual fundraiser is just the thing to round out your Thanksgiving meal! Skip the Vons bakery and help out a good cause.

Mama's Pie in the SkyFrom the press release:
Dozens of San Diego County top chefs, caterers and bakers will lovingly prepare thousands of pies to raise much-needed funds for Mama’s Kitchen. The Mama’s Pie in the Sky Bake Sale is a Thanksgiving tradition, and is considered to be the west coast’s largest bake sale. Each $20 pie provides more than six home-delivered meals to a neighbor struggling with a critical illness such as cancer or HIV/AIDS.

All proceeds from pie sales go directly into funding thousands of free, hot and nutritious Mama’s Kitchen meals, which help ensure that no one living with AIDS or cancer will go hungry in the San Diego community.

Mama’s Kitchen hopes to sell more than 6,250 pies before Nov. 20, which will raise $125,000 and fund nearly 40,000 meals. With the rising cost of food purchased to prepare the meals delivered by volunteers to hundreds of men, women and children in San Diego County, the funds raised through the Mama’s Pie in the Sky fundraiser are needed more than ever.

Here’s how Mama’s Pie in the Sky works:

1. Visit www.mamaspies.org to purchase the Thanksgiving pies of your choice: apple, pumpkin, pecan, or no sugar added apple pies. If you have a friend or colleague selling pies, choose their name. Otherwise you can just purchase from Mama’s Kitchen directly.

2. Select a convenient pick-up location. The pies will be available for pick-up at one of 19 Wells Fargo Bank branches throughout San Diego County or at Mama’s Kitchen, located at 3960 Home Avenue, San Diego, Calif. 92115.

3. Go to the location you selected on Wed., Nov. 23 between 10 a.m. and 4 p.m. to pick up your pie(s) from one of our volunteers. When you open your pie, you’ll discover what baker prepared your pie.

4. To purchase a pie that will be hand-delivered to Mama’s Kitchen’s clients on Thanksgiving morning, select the “Love-A-Client” option. For every “Love-A-Client” pie purchased, the donor will receive an entry to win a 64MB iPad2.

There is still time to sell pies this year. Mama’s Kitchen is looking for individuals and groups to form teams to sell pies before Nov. 20. Volunteers also have opportunities to win prizes from generous sponsors. To sign up to sell pies, visit www.mamaspies.org.

But don’t just take my word for it! Here’s a little message from Sam “The Cooking Guy” Zien and Elizabeth Harris of Elizabethan Desserts –

The last day to purchase the handcrafted pies is Nov. 20, 2011. Fifteen dollars from each $20 pie sale is tax-deductible. Pies can be purchased online at www.mamaspies.org or by calling (619) 233-6262.

. . . . . . . . . . . . . . . . . . . . . . . . . . . . .

OK! Back to the blog…

If you’ve been reading this blog for a while, you might know that I’m a big fan of homemade pastry crust. That is largely thanks to David, who taught me this recipe. So I thought it would be appropriate to pass on a few crust-making tips from the pro:
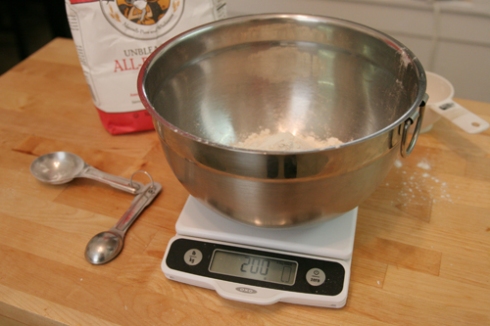
kitchen scaleThe scale! An essential kitchen item.

The perfect weights for this pastry dough are 200 grams of all-purpose flour, 100 grams of cold unsalted butter, and 100 grams of ice-cold water. This will make crust for an 11-inch tart. But if you insist on cheating, this was about 2 cups + 3 tablespoons flour, 1/2 cup minus 1 tablespoon butter, and just under 1/2 cup of water.

Probably, the best way to make a pastry dough is the old-fashioned way: working the cold butter into the flour, rolling it until the butter turns into thin sheets of flaky pastry goodness, then carefully and gradually working in a bit of ice-cold water. But the fastest way is in the food processor.

However you bring your crust together (don’t worry, more help below), you’ll want to turn it out on a sheet of plastic wrap, form into a disc, and freeze for at least an hour. You can see here that chunks of butter are still intact – a good thing!

wrapped pastry dough

Skipping ahead (okay, so I’m not actually in the mood to give tips tonight – check out this earlier post for step-by-step instructions!)… once your crust is in the tart pan and pre-baked, it’s on to the fun part! The filling. The base of this tart is traditionally a fruit spread, and you can use any kind you like: apricot or blackberry, pumpkin butter, or maybe even Nutella.

confiture collage

This time, I used the Bonne Maman chestnut creme I brought back from a summer trip to France. Unfortunately, it’s nearly impossible to find in the U.S.

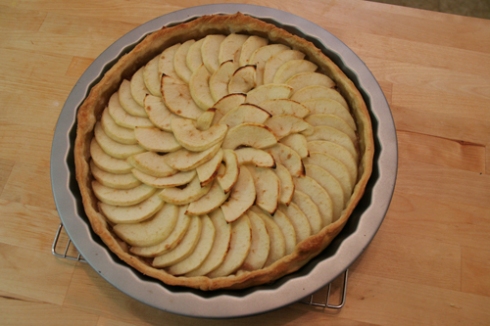
You only need a thin spread (about 2 tablespoons), then you will commence layering 5 peeled, cored, and thinly sliced Granny Smith apples in a pretty design, like so:

French apple tart

If you have an apple peeler corer slicer, lucky you! You’ll save the hand cramp I got after refusing to buy a fourth one. If not, just think positively about how slicing these uniformly is going to improve your knife skills.

Granny SmithLooks sweet and innocent, right?

It can be nice at this stage to sprinkle a layer of sugar over the top of the apples before baking. Or, you can brush a light coating of light-colored jam (such as apricot) or maple syrup over the top while it’s still hot from the oven.

sugared apples

Bake at 450 degrees F for 25-35 minutes, or until the crust is slightly brown and completely firm, and apples are desiccated. Serve warm or room temperature.

French apple tart

Recipe – Tarte Aux Pommes (Apple Tart)

200 grams all-purpose flour
100 grams cold unsalted butter
100 grams ice-cold water
1 teaspoon sugar, optional
1/4 teaspoon cinnamon
1/4 teaspoon salt
2 tablespoons fruit spread of your choice
5 Granny Smith apples
2 teaspoons granulated sugar, optional
1 teaspoon nutmeg, optional

To make the dough, sift and weigh 200 grams of all-purpose flour into a large bowl, stir in sugar, cinnamon, and salt, and cut in 100 grams of cold butter. With your hands, gradually mix in 100 grams of ice-cold water until all is well combined. (This step can be done in a food processor, but be careful not to over-process the butter at this stage.) Turn the dough out onto a cold surface and with your hands, form into a disk, wrap in cling film, and refrigerate for 30-60 minutes.

Remove dough from refrigerator and turn out onto a cold surface. Roll it to a thin round disc, fold in half and then into thirds, and wrap tightly in cling film; refrigerate for another 30 minutes.

Remove dough from refrigerator and roll it one last time, as round as possible, leaving about 1″ to go up the sides of the pan. Fold the dough in quarters and place it in a 15″ tart pan with a removable base. Unfold and press the dough into all sides, using a rolling pin to trim excess dough from the top edges of the pan. Cover the top of the dough with cling film and refrigerate until ready to assemble the tart.

Preheat oven to 450 degrees F. Peel and core apples, slice into 1/4-inch rounds, then cut in half. Remove the tart pan from the refrigerator and spread the bottom crust evenly with your preferred jam (apricot, boysenberry, or chestnut creme all work nicely).

Starting on the outer edge and moving inward, tightly overlap the apples until all slices are used. Sprinkle the entire surface with a light layer of sugar and nutmeg, if desired. (For those going sugar-free, you can brush a light layer of jam over the apples just before baking, and this will create a nice shine on the surface. I recommend St. Dalfour brand, which is only sweetened with grape juice concentrate.)

Bake immediately for 25-35 minutes, or until the crust is slightly brown and completely firm, and apples are desiccated. Serve warm or room temperature.

-apple illustration-
http://www.inkart.com/pages/food/apple.html
Kuri Squash & Garlic Soup

2 Nov

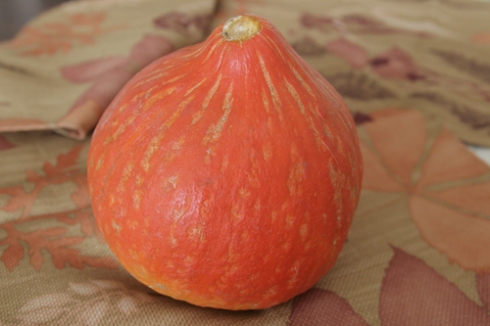
Last weekend, I had a group of friends over to carve pumpkins. So naturally, we sat around cooking, eating, and talking instead. These are my favorite elements of any party, the only things I really care about. I made a “spooky” playlist for the iPod and a bunch of brand-new, perfect-for-Fall dishes. But I’m not blogging about any of those today. Because my fantastic, whimsical friend Lori showed up that day with a pumpkin to carve and a red kuri squash for me to try, because it looked cool.

kuri squashI’ve never seen one of these before, have you?

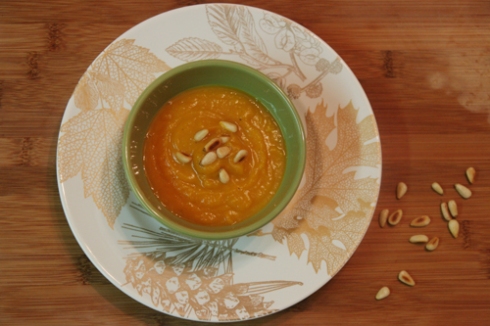
I opted to roast it and turn it into a soup with a few ingredients I already had lying around. Here’s how you, too, can make Friendship Squash Soup!

1) Preheat the oven to 400 degrees F. Halve squash and place in a glass baking dish, cut sides down. Roast for 1 hour, until squash is soft when pierced with a fork. Remove from oven, let cool, then peel and discard skin. Scrape out seeds and set aside to roast, if desired.* Resist the urge to taste gooey, marshallowey black stuff that has oozed from the squash, as it tastes horrible and is likely carcinogenic. No really – don’t eat it. Mash the squash into a Tupperware container and refrigerate for two days, until you can get around to finishing this very simple soup.

2) Roughly chop 1/2 red or white onion leftover in your fridge. Saute with 1 clove of elephant garlic or 2-3 cloves of regular garlic, and about 2 tsp roughly chopped ginger root until the onions are translucent and soft, about 15 minutes. Stir in mashed, cooked squash.

elephant garlic

3) Transfer mixture to a food processor and squeeze in the juice of 1 lime. With the processor running, slowly pour in 2 cups vegetable stock. Season to taste. Then, because the soup isn’t spicy enough and you are obsessed with garlic, roughly chop and add in some raw garlic (1/2 elephant clove or 1 regular). Key point!

4) Serve warm and garnish with toasted pine nuts or roasted squash seeds. Serves 4.

kuri squash & garlic soup

*And as an added bonus, check out this recipe roundup from The Kitchn: 12 Things To Do with Pumpkin Seeds

Such a lovely snack for work! I could get addicted to these…

roasted squash seeds

VegWeek Day 7, Gingerbread Cupcakes with Lemon Buttercream Frosting

1 Oct

“Never doubt that a small group of thoughtful, committed, citizens can change the world. Indeed, it is the only thing that ever has.”
-Margaret Mead, American cultural anthropologist (1901-1978)

VegWeek_2011

Today is the end of VegWeek, but it’s the beginning of the rest of your life! Every day is a new day, full of decisions. If you’re interested in cooking vegan more, most, or all of the time, here are some blog resources I discovered recently. Read them. Try recipes. Find community.

Choose Veg.com
Elana’s Pantry
Fat Free Vegan Kitchen
Gluten-Free Goddess
Gluten-Free Vegan Family
Manifest Vegan
Post Punk Kitchen
Vegan Baking.net
Wheat Free Meat Free

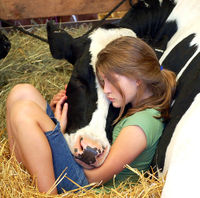
girl hugging cowImage via Denise Rich

Change starts small… you can reduce your meat consumption by 15% simply by participating in Meatless Monday! Or if you’re ready to do more, you might consider signing up for the 21-Day Vegan Kickstart Program. Cooking at home is the most efficient and affordable way to manage your health, but I assume you might want to go out every now and then… fortunately, there are also numerous resources online for finding veg-friendly establishments!

Discover Veggie
Happy Cow.net
Veg San Diego in my ‘hood… and likely something similar in yours!

“All truth passes through three stages. First, it is ridiculed.
Second, it is violently opposed. Third, it is accepted as being self-evident.”

-Arthur Schopenhauer, German philosopher (1788-1860)

For the rest of us…

Many people I know are not ready to go vegetarian, but still care about the plight of farm animals. I know these feelings are not mutually exclusive. I personally have been paying 2-3 times the price for cage-free eggs for years. Sadly, what I’ve learned is that labeling is misleading. Animals on organic, free-range farms and egg-laying hens in cage-free facilities often undergo the same abuses that non-organic, cage-free animals do. In some cases, they are actually worse off because they cannot be fed antibiotics to counteract the disease their mishandling produces.

Humane farms do exist, but they are few and far-between. Now I understand why going vegan is considered the most practical solution to the cruelty, health, and environmental concerns arising from meat-eating. However, these organizations may offer an alternative.

American Grassfed Association
Eat Wild
Humane Farm Animal Care

My hope is that we can change the future of the food industry through awareness, supply, and demand. After all, the most powerful political statement we can make is with our wallets.

sheep-loveImage via FaithFreedom.org

Gingerbread Cupcakes with Lemon Buttercream Frosting

Recipe Source: Vegan Cupcakes Take Over the World

Today’s recipe comes from a cookbook I accidentally stumbled on at the library recently, and I’m so glad I did. I love cupcakes, and I love the library! There are so many amazing recipes in this collection, and I was relieved to discover that they use normal ingredients already in my kitchen. One of the factors that has made me resistant to “alternative cooking” (e.g. vegan or gluten-free) is the sheer number of specialty items I need to stock up on. For something as indulgent as baking, I’m not likely to go out of my way. But with this book, I don’t have to. Uh oh…

Gingerbread Cupcakes with Lemon Buttercream Frosting

If you’ve never done any vegan baking, I can assure you that you won’t be able to tell the difference in these cupcakes. I took them to work, and my [amazing! wonderful!] boss scoffed as he reached for one, “vegan…” That comment was shortly followed by “wow, these are really good!”

Try them for yourself. They’re perfect for Fall. And they only make 12… go on, do it. 🙂

RECIPE – Gingerbread Cupcakes

1 1/4 cups all-purpose flour
1 teaspoon baking powder
1/2 teaspoon baking soda
3 teaspoons ground ginger
1 teaspoon ground cinnamon
1/4 teaspoon ground cloves
1/4 teaspoon salt
1/2 cup vegetable oil
1/3 cup light molasses
1/2 cup maple syrup
1/4 cup soy milk
2 tablespoons soy yogurt
1 1/2 teaspoons finely grated lemon zest
1/4 cup finely chopped crystallized ginger
(frosting recipe follows)

Preheat oven to 350 degrees F. Line a muffin pan with paper cupcake liners.

Sift the flour, baking powder, baking soda, ginger, cinnamon, cloves, and salt into a bowl and mix.

Whisk the oil, molasses, maple syrup, soy milk, yogurt, and lemon zest in a separate large bowl. Add the flour mixture to the wet ingredients and mix just until smooth. Fold in the chopped crystallized ginger.

Fill cupcake liners two-thirds full. Bake for 19 to 22 minutes, until a knife or toothpick inserted into the center comes out clean. Transfer to a cooling rack and let cool completely before frosting.

RECIPE – Lemon Buttercream Frosting

1/4 cup shortening
1/4 cup margarine, softened
2 cups confectioners’ sugar
2 tablespoons fresh lemon juice
2 teaspoons finely grated lemon zest
1 teaspoon vanilla extract

In a small bowl, cream the shortening and margarine until well combined. Add the confectioners’ sugar in roughly 1/2-cup additions. After each addition of sugar add a splash of lemon juice and beat well with a handheld mixer. Add vanilla and beat for another 3 to 5 minutes until smooth, creamy, and fluffy. Wrap tightly in plastic wrap and refrigerate until ready to use.

VegWeek Day 4, Spicy-Sweet Butternut Chili

28 Sep

“Nothing will benefit human health and increase chances for survival of life on Earth as much as the evolution to a vegetarian diet.”
-Albert Einstein

VegWeek_2011 Aside from being cruel to animals, the grand-scale farming practices of today are destroying the earth. A few stats for you, courtesy of Peta:

*According to the United Nations, raising animals for food (including land used for grazing and land used to grow feed crops) now uses a staggering 30 percent of the Earth’s land mass. More than 260 million acres of U.S. forest have been cleared to create cropland to grow grain to feed farmed animals, and according to scientists at the Smithsonian Institution, the equivalent of seven football fields of land is bulldozed worldwide every minute to create more room for farmed animals.

*Raising animals for food is grossly inefficient. While people around the world are starving, more than 70 percent of the grain and cereals that we grow in this country are fed to farmed animals. It takes up to 16 pounds of grain to produce just 1 pound of meat, and even fish on fish farms must be fed up to 5 pounds of wild-caught fish to produce 1 pound of farmed fish flesh.

*It takes more than 2,400 gallons of water to produce 1 pound of meat, while growing 1 pound of wheat only requires 25 gallons. You save more water by not eating a pound of meat than you do by not showering for six months! A totally vegan diet requires only 300 gallons of water per day, while a typical meat-eating diet requires more than 4,000 gallons of water per day.

*It takes more than 11 times as much fossil fuel to make one calorie from animal protein as it does to make one calorie from plant protein.

*According to Greenpeace, all the wild animals and trees in more than 2.9 million acres of the Amazon rain forest in Brazil were destroyed in the 2004-2005 crop season in order to grow crops that are used to feed chickens and other animals in factory farms.

*According to the Environmental Protection Agency (EPA), the runoff from factory farms pollutes our waterways more than all other industrial sources combined. There are no meaningful federal guidelines that regulate how factory farms treat, store, and dispose of the trillions of pounds of concentrated, untreated animal excrement they produce each year. This waste may be left to rot in huge lagoons or sprayed over crop fields; both of these disposal methods result in runoff that contaminates the soil and water and kills fish and other wildlife. The concentration of parasites, bacteria, and chemical contaminants in animal excrement can wreak havoc on the ecosystems affected by farm runoff and can sicken people who live near these farms.

*Many of the millions of pounds of excrement and other bodily waste produced by farmed animals every day in the U.S. are stored in sprawling, brown lagoons. These lagoons often seep or spill into surrounding waterways and kill massive numbers of fish and other animals. The massive amounts of feces, fish carcasses, and antibiotic-laced fish food that settle below fish farm cages also contribute to water pollution and have actually caused the ocean floor to rot in some areas.

*A Consumers Union study in Texas found that animal feedlots in the state produce more than 14 million pounds of particulate dust every year and that the dust “contains biologically active organisms such as bacteria, mold, and fungi from the feces and the feed.” The massive amounts of excrement produced by these farms emit toxic gases such as hydrogen sulfide and ammonia into the air.

animal planet
Responsibility as spirituality – we are all connected.

“This food is the gift of the whole universe – the earth, the sky, and much hard work. May we live in a way that is worthy of this food. May we transform our unskillful states of mind, especially that of greed. May we eat only foods that nourish us and prevent illness. May we accept this food for the realization of the way of understanding and love.”

-The Five Contemplations
Thich Nhat Hanh
Living Buddha, Living Christ

A few years ago, I had the good luck to hear Thich Nhat Hanh speak at USD. The subject of his talk was how to create peace in the world, but for the first half of it, he talked about mindfulness in everyday life. He talked about walking barefoot and feeling the ground under your feet. He talked about eating slowly, with attention, without distractions. He talked about meditation. He spoke softly, and people were leaving the auditorium in droves. But then, almost imperceptibly, his message became exponentially larger. He said that when we eat slowly and contemplate our food, we think about where it comes from, and we touch the suffering of the world. When we eat a cow, we see how that cow suffered. We see the enormous amounts of food and water that were spent to raise it, and all the starving people in the world who do not have food or water. Our awareness then informs our choices.

His call was for personal responsibility, and many people missed the message. I think that’s a good illustration for the world at large. Most change happens slowly, in small ways, and it begins with you and me.

for the children

Vegan Butternut Squash Chili

Recipe Source: Adapted from Gluten-Free Goddess

This chili is a much more colorful and varied version of the typical meat-and-beans version you may be used to. It’s also a bit on the brothy side, kind of a cross between chili and soup.

Personally, I felt it was a bit too sweet, especially considering that the fire-roasted tomatoes and butternut squash add a little natural sweetness of their own. So I’ve omitted the agave nectar and balsamic vinegar from the original recipe, and doubled the spices. I used a poblano pepper and then ended up dumping in some Tabasco, so a combination of peppers (maybe poblano + jalapeno?) might be a good idea. And if you’re not into the heat, of course, you can try it the original way!

I also omitted the celery because I didn’t have any on-hand and don’t particularly like it, and used some fresh ginger to supplement the powdered when I ran out. Next time, I think I’ll use a trio of black, red, and white beans, rather than two cans of black. Basically – there’s a lot going on in this soup, so feel free to experiment!

vegan butternut chili

1 tablespoon neutral-flavored oil
3-6 cloves garlic, to taste, minced
2 teaspoons each: cumin, chili powder, and ginger
1 medium red or white onion, chopped
1 red bell pepper, cored, seeded, diced
1 green bell pepper, cored, seeded, diced
2 cups butternut squash, cubed
3 cups gluten-free broth
1 (28-oz) can Muir Glen Fire Roasted Whole Tomatoes , diced or broken up, with juice
1 cup chopped green chiles, mild or hot, as you prefer
2 (14-oz) cans black beans , rinsed, drained
1 (14-oz) can white Northern beans , or red kidney beans, rinsed, drained
lime juice, avocado, and cilantro for garnish

Heat the oil in a large pot over medium heat, add the spices, and stir to heat through for a minute. Add onions and stir for 2-3 minutes, then add the remaining ingredients except the lime. Lower the heat, cover, and simmer, stirring occasionally until chili has reached the desired consistency. Add a little more broth if needed, to thin. Cook for an hour or so until all the flavors have combined and the sauce is thickened and rich.

Before serving, squeeze in the juice from half a lime; stir. Taste test for seasoning adjustments – more lime? A pinch of salt? More heat? A touch of agave? You decide.

Serves 8-10.

Olive Garden Pasta E Fagioli

12 Sep

Recipe Source: CopyKat Recipes

As a busy blogger, it sometimes happens that I cook and photograph a dish, only to store it on my computer for a year before blogging it. This happens to be such a recipe, going back to my pre-vegetarian days. I haven’t made it lately, but suspect it would be just as delicious with the ground beef left out, or a meatless substitute.

colorful Pasta e Fagioli

This soup is wonderful and hearty, perfect for a cold day, even a light lunch. I’ve ordered it, along with a salad, many times in an attempt to control my portion size at Olive Garden – the only Italian restaurant in my small hometown.

I like that this soup can serve as a one-dish meal, as it combines vegetables, protein and pasta all-in-one. Throw in a side salad and piece of crusty bread, and it’s very satisfying. This is the first “CopyKat” recipe I’ve made, and it’s pretty spot-on from what I remember ordering in the restaurant. I scaled down the ingredients to make this more manageable for home cooking.

Pasta e FagioliBon Appetit! Or as they’d say on an Italian plate, Buon Appetito!

RECIPE – Olive Garden Pasta E Fagioli

2 teaspoons vegetable Oil
1 pound Ground beef
6 ounces Onion; chopped
7 ounces Carrots; slivered
7 ounces Celery; diced
24 ounces Tomatoes; canned, diced
1 cup cooked Red Kidney beans
1 cup cooked White kidney beans
44 ounces Beef stock
2 teaspoons Oregano
2 teaspoons Pepper
3 teaspoons Parsley; (fresh chopped)
1 teaspoons Tabasco sauce
24 ounces Marina Style Spaghetti sauce
4 ounces dry pasta Shell macaroni; or other pasta

Saute beef in oil in large 10-qt. pot until beef starts to brown. Add onions, carrots, celery and tomatoes and simmer for about 10 minutes. Drain and rinse beans and add to the pot. Also add beef stock, oregano, pepper, Tabasco, spaghetti sauce, and noodles. Add chopped parsley. Simmer until celery and carrots are tender, about 45 minutes.

Makes about 5 qts, serves 6.

Tip: If you want to freeze this soup, it is best when you don’t add the pasta, cooked pasta doesn’t freeze very well. If you freeze the soup you can always cook up some fresh pasta and stir it in when you are ready to serve your family.

Portobello or Chicken Pot Pie

22 Jan

Recipe Source: Adapted from allrecipes.com

For my first recipe of 2011 – albeit a bit tardy – I want to share with you my last meal of 2010. (Boy, that sounds morbid!) After New Year’s Eve plans with friends fell through and our enthusiasm for celebrating increasingly waned, the prospect of staying in with a home-cooked meal and fire in the fake electric fireplace became increasingly attractive. We decided to perfect our pot pie-making skills.

I originally made a portobello version of this pie for a group of my best friends, which includes a vegetarian. But the recipe can easily be adapted for meat-eaters by substituting chicken and chicken stock for the portobello caps and vegetable stock.

I also made a number of modifications based on consistent reviews from allrecipes, such as increasing the amount of flour for the gravy, using stock in place of water, and adding a splash of wine. The proportions here are half of what they were in the original recipe, since we made two pies with it!

filling pot pie

Part I: Make your own crust. It’s worth it.

My go-to recipe for crust is David’s go-to recipe, which he and his mother have perfected after years of baking amazing apple tarts. If you’re pressed for time, the crust can be made partially or entirely overnight.

Are you ready for the Golden Proportion?

200g all-purpose flour
100g cold butter (or 1 stick)
100g cold water

This will make enough crust to fill the bottom of an 11-inch tart pan. For the pot pie, which uses a 9-inch pie dish and needs a top and bottom crust, we used 1.5 times the recipe, so 300g flour, 1.5 sticks butter and 150g of water. (Yes, you need a scale. Every real cook should have one, and if you want to make your own crust, you are a real cook! :))

There are a couple of ways to accomplish mixing the dough together. The easiest method is to beat the flour and butter in a food processor while slowly pouring in the water. Be careful not to overbeat the butter – coarse crumbs will result in a flaky dough. It’s better to undermix than overmix, at this stage.

Or, for a more “rustic” method, you can cut the butter into the flour in a large bowl using a pastry cutter then form a well in the center, pour in the water, and continue mashing the flour mixture to incorporate. Note: you’ll want to avoid using your hands during this process, as their warmth will melt the butter and reduce the flakiness of the finished crust. And when it comes to crust, it’s good to be flaky!

Form a ball with the dough and turn it out onto a piece of plastic wrap. Flatten the ball into a disk, wrap it tightly, and refrigerate for at least 30 minutes, or overnight. Then remove the dough from the fridge and, on a smooth, floured surface, roll it into a thin strip, about 5 inches wide, 10 inches long and 1/2-inch thick. (If the dough has been chilling overnight, let it sit out for about 5 minutes so it will be easier to work with.)

rollling dough

Fold the top and bottom ends over to meet in the center, then fold in half. Roll the dough out again, repeating this process twice. You’ll want to do this step quickly, so the butter does not melt. Wrap the dough again and refrigerate for 30 minutes.

folding dough

At this point, preheat your oven to 425 degrees F. Finish the crust with one more round of rolling and folding, then cut 1/2 off the end to save for your top crust. Wrap and refrigerate this portion.

cutting dough

Roll the dough into a thin disk large enough to fill your pie dish on the bottom and up the sides. When the dough is about the size you want, let it “relax” for a minute or two. The dough will shrink slightly, then you can roll it a second time. You don’t want it shrinking in your pie dish!

Finally, fold the disk into quarters (a dough scraper can be a great help with this, if you have one, otherwise use the thinnest scraper you have) and place it in the pie dish. Unfold the dough and gently adjust it as needed to evenly fill the dish.

quartered dough

Lightly prick the bottom of the dough with a fork. Cut a piece of parchment paper (not wax!) into a circle the size of the bottom of your pie dish, and place it onto the dough. Over that, pour enough pie weights to cover the parchment paper. Large, raw beans such as black or pinto are great to use as pie weights and inexpensive – but avoid small legumes such as lentils, and especially avoid popcorn!

pie weights

Bake the crust for 15 minutes, remove the parchment paper and weights, and bake for another 3 minutes. Set aside to cool.

Part II: Make the filling.

To make the filling, start by boiling three potatoes. I like red potatoes for this, but you can use any kind you like. (If they are larger, account for the difference by using two.) Lightly steam the peas, if frozen. If you are making a chicken pot pie, lightly salt and pepper both sides of a chicken breast, and cook through in a pan over medium-low heat. Cut into bite-size pieces and set the meat aside for later.

potatoes

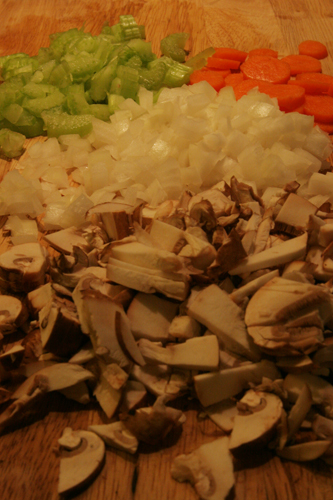
Next, chop the onions, celery, carrots, and shiitake and portobello mushrooms (if using). I like everything in this pie to be a fairly fine dice, slightly smaller than bite-sized.

veggies

Saute the carrots and celery for about five minutes, then add in the all remaining veggies except portobello mushrooms and saute another 5-8 minutes, adding salt and pepper to taste. If you’re making the portobello version of this pie, add the portobellos last. Otherwise, add in the chicken here. To make the gravy, whisk the flour into the stock and wine in a medium bowl, then pour into the vegetables and stir to incorporate everything. Finally, pour the filling into your pre-baked pie crush.

pot pie filling

Remove the reserved dough from the refrigerator, roll it into a disc large enough to overlap your pie dish by about one inch on all sides, and gently drape the dough over the pie.

baked pot pie

Part III: Bake, eat.

Bake for 40 minutes in a 350-degree oven, until the crust is golden brown. Then chow down on that baby!

pie slice

RECIPE – Portobello or Chicken Pot Pie

For crust:
300g all-purpose flour
3/4 cup (1 1/2 sticks) cold butter
150g cold water
OR 2 (9 inch) unbaked pie crusts

For the filling:
3 small red potatoes
2 tablespoons olive oil
1/2 cup sliced onion
1 stalk celery, chopped
1 carrot, cubed
1/2 cup thinly sliced shiitake mushrooms (or a blend)
1 1/2 cups chicken or vegetable stock
1/4 cup white wine
2 tablespoons tamari or soy sauce
4 tablespoons all-purpose flour
1 portobello mushroom cap or 1 small chicken breast, cut into bite size pieces
1/2 cup peas
1 teaspoon fresh thyme
1 teaspoon fresh oregano
Kosher salt and freshly ground black pepper, to taste

Preheat the oven to 350 degrees F (175 degrees C). Press one of the pie crusts into and up the sides of a 9 inch pie plate. Prick holes into crust with a fork, cover with parchment paper and Bring a saucepan of water to a boil. Add potatoes and cook until tender, 10 to 15 minutes. Drain, and cut into cubes. Set aside.

Heat 1 tablespoon of olive oil in a large saucepan over low heat. Add onion, celery, carrot, and shiitake mushrooms, cover, and let the mushrooms sweat for about 7 minutes, stirring occasionally. Whisk flour into stock and pour mixture along with wine and soy sauce into saucepan. Bring to a boil and allow to simmer.

Heat remaining olive oil in a large skillet over medium-high heat. Add portobello or chicken pieces and sauté briefly until mushrooms are browned on the outside or chicken is cooked through. Add to the gravy mixture along with the peas and potatoes. Simmer for about 10 minutes, stirring occasionally. Season with thyme, oregano, salt and pepper.

Pour the mixture into the prepared crust. Cover with the other pie crust, and crimp edges to seal. Make a few slits in the top crust to vent steam.

Bake for 40 minutes in the preheated oven, until crust is golden brown.

Roasted Vegetable Soup & Homemade Croutons

23 Dec

The greatest delight of the fields and woods minister is the suggestion of an occult relation between man and the vegetable.
I am not alone and unacknowledged. They nod to me and I to them.
~Ralph Waldo Emerson

Recipe source: Adapted from Ina Garten, Barefoot Contessa Family Style

Well, it’s official, we’re now two days into winter. And besides cold weather and Christmas just around the bend, what that mostly means for me is a bellyache from the overwhelming amount of cookies, cakes, pies, chocolates, fudge and what-have-you everywhere in my sight. Co-workers make them, friends give them, and it would be rude not to consume them… right? Since you might be facing this dilemma as well, I thought I’d supply you with a little detox.

Soup is always a comfort on a cold winter day, and easy to eat when you have a cold. This recipe is extremely variable and can be adjusted to use whatever vegetables are in season throughout the year. For now, it’s carrots, parsnips, sweet potatoes, and butternut squash.

The first time I made this recipe, I followed Ina Garten’s instructions to a tee, and wasn’t thrilled. It was too carrot-ey for me, and just overall bland.

roasted veggies

So, I halved the amount of carrots and added an eggplant.

roasted veggies

I also added a ton of flavor with my no-so-secret weapons, onion, garlic, and ginger. I think onions and garlic should appear in just about any savory dish, and especially soups, so I’m surprised Ina didn’t include them the first time around. (puzzled face)

onions, garlic, ginger

Regardless. To make this soup, you will chop the vegetables of your choice, toss with olive oil, salt, and pepper, and roast in a 425-degree oven for about 30 minutes. Meanwhile, saute the onions, garlic, and ginger in a large soup pot, then transfer to a food processor and puree. When the vegetables come out of the oven, add them to the food processor and puree as well. How long you puree depends on the texture you like – I like my soup slightly chunky.

pouring stock

If you have a super-cool food processor with a pouring tube like this, slowly pour 3 cups of chicken or vegetable sock while the blade is spinning to keep the processor from jamming. If not, remove the lid and add your stock incrementally between pulses.

Just before serving, pour the mixture back into the pot and heat to warm.

Ina’s soup:
roasted vegetable soup

My soup:
roasted vegetable soup

This soup is delicious serve with some kind of bread. When I’m in a hurry, I like lightly toasted rosemary bread. In a major hurry, Breton crackers. But if I have a little more time, homemade croutons are wonderful… provided I can resist eating the oil and salt-soaked bread before toasting it! I like to use sourdough for this, but you can use any loaf you like.

sourdough loaf

Wishing you a warm and happy winter surrounded by those you love. xox

RECIPE – Roasted Vegetable Soup

2 carrots, peeled
1 parsnip, peeled
1 sweet potato, peeled
1 eggplant
1/2 small butternut squash (about 2 pounds), peeled and seeded
3 tablespoons good olive oil
2 teaspoons kosher salt
1 teaspoon freshly ground black pepper
2 cloves garlic
1 teaspoon fresh ginger, chopped
1/2 white onion
3 cups chicken or vegetable stock
Kosher salt and freshly ground black pepper
Brioche croutons, recipe follows
Good olive oil

Preheat the oven to 425 degrees F.

Cut the carrots, parsnip, sweet potato, eggplant, and butternut squash in 1- to 1 1/4-inch cubes. All the vegetables will shrink while baking, so don’t cut them too small.

Place all the cut vegetables in a large bowl or gallon-size freezer bag, drizzle with olive oil, salt, and pepper, and toss well to coat. Spread vegetables in a single layer on 2 sheet pans. Bake for 25 to 35 minutes, until all the vegetables are tender, turning once with a metal spatula.

Meanwhile, saute garlic and ginger in about two tablespoons of olive oil in a large soup pot for about 1 minute. Add in diced onion and saute for about 5 minutes, until onions are lightly browned. Transfer onion mixture to a food processor and puree.

In two batches, coarsely puree the roasted vegetables with the onion mixture, pouring in chicken or vegetable stock to aid the food processor as you go. Pour the pureed vegetables back into the soup pot and season, to taste. Thin with more stock if desired, and reheat. The soup should be thick but not like a vegetable puree, so add more stock and/or water until it’s the consistency you like. Serve with homemade croutons or crusty bread.

Serves 4

RECIPE – Homemade Croutons (skip if gluten-free)

1 12-ounce loaf of bread (sourdough, brioche, challah)
2 tablespoons good olive oil
1/2 teaspoon kosher salt
1/4 teaspoon freshly ground black pepper

Preheat the oven to 350 degrees.

Slice the bread about 3/4 inch thick. Cut off the crusts and then cut the slices in 3/4 inch dice. You should have 6 to 8 cups of croutons.

Place the croutons on a sheet pan and toss them with the olive oil, salt, and pepper. Bake for 10 to 15 minutes, tossing once, until they are nicely browned on all sides. Cool to room temperature before using and store in a sealed plastic bag.

Holiday treats: Sparking Cranberries & Spicy-Sweet Roasted Nuts

21 Dec

Recipe source: Sparkling Cranberries – 101 Cookbooks
Recipe source: Spicy Sweet Roasted Nuts – slashfood

Sparkling Cranberries

This post is written with many thanks to Heidi at 101 Cookbooks, for posting this recipe in the first place, and for her dedication to finding the just-right sugars for every step of the process. Better you than me, sister.

As with so many of my recipes, I found these little gems about a year ago and bookmarked them, only to forget about them. Then while I was scouring through my recipe-labeled emails to find an appetizer for Gourmet Friends, I discovered it again in an email I’d sent to myself. Thank you, Ghost of Christmas Past! These are a beautiful festive treat for a winter party, and very unique.

I’ve given only half the quantities of the original recipe here, because most people will only pop one or two each, for the novelty and intrigue. In general, people don’t go crazy over natural cranberries, and they’re sure to get some puckers from the kids, who think they look like candy. (Ha ha, suckers!) Rolling these berries perfectly is also incredibly time-consuming and laborious, and I think once you get to one cup, you won’t miss the second.

They really are pretty, though. I swear.

sparkling cranberries

To start, you’ll measure out a cup of fresh cranberries, making sure to pick out any shriveled or otherwise funky berries. Soak these overnight in a simple syrup (Heidi recommends making it with raw sugar, which gives a really nice molasses flavor).

cranberries

The next day, drain the berries. They should stay a little sticky and they’ll look really shiny and gorgemous. *ooooh, shiiiiiny*

While the berries are still wet, it’s time to roll them first in organic, unbleached sugar (a slightly bigger grain than your normal refined), and then in refined sugar. To set up a little station for yourself, you’ll need a bowl with your cranberries, a small bowl with organic unbleached sugar, a small bowl with regular refined sugar (and reserves of both), a slotted spoon, and the serving bowl for your finished cranberries. You’ll also want a comfy chair, ‘cuz this is gonna take a while.

cranberry rolling station

To coat, drop a berry into the organic sugar, shake off excess by tapping a slotted spoon against the bowl, then repeat in the refined sugar.

cranberry in sugar

Note: the sugar level in these bowls is too much. As you work through this process, some of the simple syrup will stay behind, creating lumps in your sugar. And that means lumps on your berries, which looks less like freshly fallen snow and more like the sludge the ice truck has pushed to the side of the road. You can see it starting a little in this picture, where I have attempted to roll entirely too many berries at once.

too many cranberries

In the end, though, with a little patience, you’ll get this very lovely result. I found that leaving these out, uncovered, made the sugar crunchy while keeping the inside delightfully juicy. Storing them in a covered bowl will soften the sugar some, and it’s not as nice. Over a couple days, the sugar will also start to clump and congeal, creating a weird cranberry-blob monster. So it’s best to roll these the same day you plan to serve them.

sparkling cranberries

Spicy-Sweet Roasted Nuts

This is a tried-and-true recipe I’ve made several times now, and it’s always a hit with a group of friends, or when I’m huddled away in my little work cubicle, storing up nuts for the winter. It’s also extremely easy to make.

nuts in measuring cup

You can use any combination of nuts for this, so long as they are raw. I usually buy raw nuts in bulk, but Trader Joe’s sells them as well, and for a decent price. My personal favorite mixture is cashews, almonds, pecans and walnuts. Sometimes I’ll use a few more cashews than almonds, as they seem to be the mildest and absorb flavor the best. And almonds are dry and they catch in my throat. *cough*

toasting nuts

Begin by dry-toasting the nuts in a large pan over a medium flame. Be sure to keep an eye on them so they don’t burn, and stir often. Eventually you will notice brown or black spots begin to appear; this is how you know they’re done.

In a small saucepan, melt butter and maple syrup together, then mix in fresh chopped rosemary and cayenne pepper to taste. Immediately pour this mixture over the toasted nuts, stir well to coat, and spread the nuts over a foil-lined baking sheet for easy cleanup. Sprinkle the nuts with sea or kosher salt and bake in a 350-degree preheated oven for about 20 minutes. Voila – you have it, a great party dish or gift.

spicy sweet roasted nuts

~ Happy Winter Solstice! ~

RECIPE – Sparkling Cranberries

For the simple syrup, raw cane sugar or real brown sugar lends a nice molasses flavor to the cranberries, but regular granulated sugar (or a blend of brown/white) will work.

1 cup cranberries, picked over
1 cup water
1 cup sugar (see head notes)
More sugar for coating: I do a mix of medium-grained organic sugar for the first coating, and then a second toss with regular granulated white sugar. You don’t want a huge grain for that first toss, just something larger than standard sugar, smaller than most turbinado sugars.

Place the cranberries in a medium glass bowl and set aside. Make a simple syrup by bringing the water and sugar just to a simmer in a medium saucepan. Let the syrup cool for a couple minutes and then pour it over the cranberries. If the syrup is too hot the cranberries will burst, so be careful. Cover and refrigerate overnight.

The next day, drain the cranberries and toss them with larger grained sugar until they are well coated. I only use a scoop of sugar at a time, and small batches of cranberries, so the sugar doesn’t get too damp. Place the coated cranberries on a baking sheet to dry for a few hours.

Do a second toss with the regular granulated sugar, this typically takes care of any sticky spots on the cranberries. Let dry another hour.

Makes 1 cup of sparkling cranberries.

RECIPE – Spicy Sweet Roasted Nuts

4 cups of raw nuts (almonds, walnuts, cashews, pecans)
4 tablespoons unsalted butter
4 tablespoons real maple syrup
1 tablespoon fresh rosemary, finely chopped
1/2 teaspoon cayenne pepper, more or less depending on your taste
2 teaspoons sea salt

In a large skillet, toast the nuts over medium heat, stirring occasionally so that they don’t burn. In a small saucepan, melt butter and maple syrup together. Once melted, add rosemary and cayenne. When the nuts are toasted (when the vast majority have darkened spots), pour the butter mixture over the nuts and toss to coat.

Spread the glazed nuts out on a parchment-lined cookie sheet (makes for far easier cleanup) and roast in a 350 degree oven for 15-20 minutes, depending on your desired level of roast.

When you take the nuts out of the oven, sprinkle the salt over the top, so that it adheres to the still-sticky nuts. I like to use the flaky Maldon sea salt for these nuts, but in a pinch, kosher will also do just fine.

Pumpkin Banana Mousse Tart

7 Dec

Recipe source: Barefoot Contessa Family Style

Ina Garten on tradition: “Every family has traditions–events that they repeat year after year. These traditions give us all a sense of place and community…. Traditions reassure us that we belong together, and for me, that’s so grounding. I love them all.”

One of my family’s traditions at Thanksgiving is that I make dessert. This is mostly because I volunteered, because for a lot of years, dessert was the only kind of food I really liked. As you know from a few posts ago, I made pecan pie for my family and co-workers this year. But I was still left with another Thanksgiving dessert-making opportunity at my monthly cooking group, Gourmet Friends. We have a Thanksgiving-themed get-together every November, and it’s a great chance to test-run the recipes we might be considering for our families.

pumpkin banana mousse tart

This pie is a really nice subtle, elegant twist on classic pumpkin pie, which let’s face it, is a bit pedestrian. My palate is a bit too snobby nowadays for plain ol’ pumpkin pie.

The crust is a basic graham cracker crust, though, to which I can only say, why mess with a good thing? All that’s involved here is graham crackers, butter, sugar, and cinnamon. If you have a food processor, it takes about 5 seconds to break up the crackers, and another two minutes to blend it all together.

pie crust

The filling is a bit more complicated, but not impossible. The most important thing to know about it is to make it in advance. You’ll need to heat half-and-half, pumpkin, brown sugar, salt, cinnamon, and nutmeg in a double-boiler, then add in egg yolks (being careful to temper them so they don’t scramble), then a mixture of dissolved gelatin, banana, and orange zest. The orange zest was one of the things that really attracted me to this recipe!

pie filling

After that mixture has cooled, you will fold in a whipped cream mixture, pour it into the baked crust, and chill for 2 hours or overnight.

pouring pie filling

Finally, the last step is to cover the pie with a whipped cream topping and chill again. Ina suggests sprinkling the top with orange zest, which I think is a classy idea.

whipped cream

I don’t have a picture of a cut slice because I was too busy noshing on it… always a difficulty for me when pie or cake is concerned! But inside this looks very similar to a traditional pumpkin pie. Actually – it’s kinda like this picture I’m shamelessly stealing from a Google search:

pie slice

Ina’s recipe doesn’t call for a pecan-caramel topping, but now that I’m looking at it, it doesn’t seem like a bad idea! I guess I’ll just have to make this again… pity…

RECIPE – Pumpkin Banana Mousse Tart

I wrote this recipe for my entertaining series for California magazine. It was inspired by a pumpkin mousse that my mother had made for years for Thanksgiving. It’s lighter and much more flavorful than that cloying old pumpkin pie. People really do go nuts for it.

Crust
2 cups graham cracker crumbs (14 crackers)
1/3 cup sugar
1/4 teaspoon ground cinnamon
1/4 pound (1 stick) unsalted butter, melted

Filling
1/2 cup half-and-half
1 (15-ounce) can pumpkin puree
1 cup light brown sugar, lightly packed
3/4 teaspoon kosher salt
1/2 teaspoon ground cinnamon
1/4 teaspoon ground nutmeg
3 extra-large egg yolks
1 package (2 teaspoons) unflavored gelatin
1 ripe banana, finely mashed
1 teaspoon grated orange zest
1/2 cup cold heavy cream
2 tablespoons sugar

Decoration
1 cup (1/2 pint) cold heavy cream
1/4 cup sugar
1/2 teaspoon pure vanilla extract
Orange zest, optional

Preheat the oven to 350 degrees F. Combine the graham cracker crumbs, sugar, cinnamon, and melted butter in a bowl and mix well. Pour into an 11-inch tart pan with a removable bottom and press evenly into the sides and then the bottom. Bake for 10 minutes and then cool to room temperature.

For the filling, heat the half-and-half, pumpkin, brown sugar, salt, cinnamon, and nutmeg in a heat-proof bowl set over a pan of simmering water until hot, about 5 minutes. Whisk the egg yolks in another bowl, stir some of the hot pumpkin into the egg yolks to heat them, then pour the egg-pumpkin mixture back into the double boiler and stir well. Heat the mixture over the simmering water for another 4 to 5 minutes, until it begins to thicken, stirring constantly. You don’t want the eggs to scramble. Remove from the heat.

Dissolve the gelatin in 1/4 cup cold water. Add the dissolved gelatin, banana, and orange zest to the pumpkin mixture and mix well. Set aside to cool.

Whip the heavy cream in the bowl of an electric mixer fitted with a whisk attachment until soft peaks form. Add the sugar and continue to whisk until you have firm peaks. Carefully fold the whipped cream into the pumpkin mixture and pour it into the cooled tart shell. Chill for 2 hours or overnight.

For the decoration, whip the heavy cream in the bowl of an electric mixer fitted with the whisk attachment until soft peaks form. Add the sugar and vanilla and continue to whisk until you have firm peaks. Pipe or spoon the whipped cream decoratively on the tart and sprinkle, if desired, with orange zest. Serve chilled.

Saffron Risotto with Butternut Squash

6 Dec

Recipe source: Barefoot Contessa Family Style

Part of the beauty of this cookbook, for me, is Ina’s advice and small observations on entertaining. The idea of “family style” permeates through the book, with comforting recipes like the chicken noodle soup I posted yesterday, fun snacks for kids, and then, especially – quotes like this, which expand the definition of family to one that resonates with me:

“Most people wouldn’t bat an eye about asking their sister to help with dinner, so why are we so reluctant to ask the friends we invite to our house? Wouldn’t you be flattered if a friend said ‘I’d love it!’ when you offered to help? I’d feel valued and part of the A team. When my friends come for dinner, often I serve the main course, but I’ll ask someone else to pour the wine, and a third person to help me with dessert, so we’re all in it together. It’s a community, it’s collaborative, and it’s so much more fun (not to mention easier!).”
I chose to share this quote with you now because risotto requires A LOT of stirring. A lot, a lot, a lot. And Ina brilliantly suggests enlisting your friends to take turns stirring the risotto, preferably with a drink sloshing in the other hand (oh wait, that was my addition), which I think I will do if I ever make this dish again.

Like yesterday’s post, risotto is yet another classic dish I’ve never made. I’ve never been a fan of risotto because of its mushy texture, but the other ingredients in this dish sounded so delicious that I decided to re-open my mind.

The most important lesson I took from making it is that it takes patience. It takes a lot of time. And did I mention – a lot of stirring?

To begin, you will cube and roast a whole 2-lb butternut squash. This is the first recipe I made with butternut, and I discovered that it’s not fun to peel. Not nearly as fun as just throwing the whole thing in the oven until it gets soft, like in this soup.

butternut squash

But there are advantages to this method, specifically, a less mushy, mashed texture. It might be possible to get away with a mash in this recipe… but this time I followed Ina’s instructions. Through trial and error, I found the easiest way to peel this was to cut a flat end and wiggle the vegetable peeler from the top-down. Which doesn’t mean I didn’t break my peeler the second time I did this… so use a very sharp peeler, and go slowly.

peeling butternut squash

While the squash is in the oven, you’ll saute pancetta and shallots in a Dutch oven or the heaviest-bottomed pan you have. Normally when I read this kind of instruction, I am blasé… but with risotto, I wouldn’t mess around. The heat has to be *just right* for this to work, and the cast iron in Dutch ovens will hold the heat more evenly than the type of no-account flimsy Teflon nonsense I own. I borrowed this Dutch oven, which I think would make Ina proud!

Next you’ll add arborio rice and wine, then saffron, salt and pepper, then ladle by ladle, chicken stock. Ina gives very specific instructions on this so I won’t elaborate, except to show you this picture, which I took to be “a little dry” like she describes.

risotto

My final product was also like the “gluey mess” she describes… but tasty. In hindsight, I think medium heat was too low, and medium-high would have been fine. She says you need to make this twice to get it right, and I’m convinced!

I love pears, and I try to eat as many as humanly possible while they are beautiful and yellow in the Fall. So to complete our meal, I served the risotto with Ina Garten’s Endive, Pear, and Roquefort Salad. Since I don’t have a house in the Hamptons, I substituted a common man’s blue cheese for the roquefort. Otherwise, I followed the recipe exactly. This is definitely a favorite… also nice over romaine.

pear salad

And for dessert, I made spiced roasted plums with vanilla bean ice cream.

spiced plums

This was about as autumnal a meal as I could dream up!

RECIPE – Saffron Risotto with Butternut Squash

I used to avoid risotto because I thought you had to stand by the stove for hours, stirring – not exactly my style! But, I decided to give it a try and, instead, found a dish that’s so delicious and cooks in 30 minutes. Test this first on your family and then when you have a party, you can invite your guests into the kitchen for drinks while everyone takes turns stirring the risotto.

1 butternut squash (2 pounds)
2 tablespoons olive oil
Kosher salt and freshly ground black pepper
6 cups chicken stock, preferably homemade
6 tablespoons (3/4 stick) unsalted butter
2 ounces pancetta, diced
1/2 cup minced shallots (2 large)
1 1/2 cups Arborio rice (10 ounces)
1/2 cup dry white wine
1 teaspoon saffron threads
1 cup freshly grated Parmesan cheese

Preheat the oven to 400 degrees.

Peel the butternut squash, remove the seeds, and cut it into 3/4-inch cubes. You should have about 6 cups. Place the squash on a sheet pan and toss it with the olive oil, 1 teaspoon salt, and 1/2 teaspoon pepper. Roast for 25 to 30 minutes, tossing once, until very tender. Set aside. Meanwhile, heat the chicken stock in a small covered saucepan. Leave it on low heat to simmer.

In a heavy-bottomed pot or Dutch oven, melt the butter and saute the pancetta and shallots on medium-low heat for 10 minutes, until the shallots are translucent but not browned. Add the rice and stir to coat the grains with butter. Add the wine and cook for 2 minutes. Add 2 full ladles of stock to the rice plus the saffron, 1 teaspoon salt, and 1/2 teaspoon pepper. Stir, and simmer until the stock is absorbed, 5 to 10 minutes. Continue to add the stock, 2 ladles at a time, stirring every few minutes. Each time, cook until the mixture seems a little dry, then add more stock. Continue until the rice is cooked through, but still al dente, about 30 minutes total. Off the heat, add the roasted squash cubes and Parmesan cheese. Mix well and serve.

*Marcella Hazan advises that correct heat is important in making risotto. It should be “lively”; too high heat and the grains don’t cook evenly, and too low heat will result in a gluey mess. It should cook in 30 minutes. After the first try, you’ll get the idea.

*Saffron is collected from the stamens of crocuses, which is why it’s so expensive. Use the strands, not the powder.

*Pancetta is Italian bacon. If you can’t find it, use any good-quality bacon.

Serves 4 to 6