Tag Archives: library week

Frozen Key Lime Pie

12 Dec

Recipe source: Barefoot Contessa Family Style

Ina Garten week The closest I’ve come to a homemade key lime pie was my mother’s, circa 1992, for a church potluck. It came out brown. And tart. VERY tart. Like, mouth-puckering, face-scrunching tart. I don’t know what happened, because my mom followed the recipe and she is a good cook. Maybe it was a bad recipe. But it was very, very bad. So I’ve been a bit scared. But a good key lime pie really can be a heavenly thing, so I decided to attempt it with Ina.

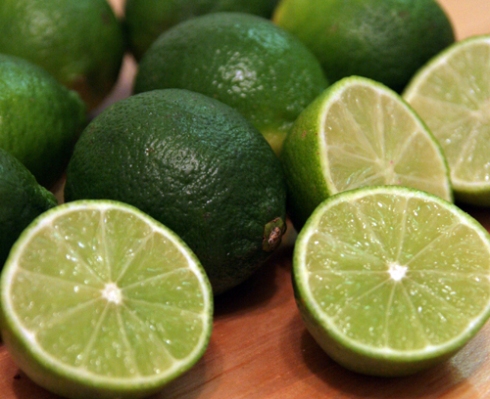
limes

Plus, key lime pie reminds me of my favorite show, Dexter! So I began my quest for the best key lime pie recipe… sans sodium pentathol, that is.

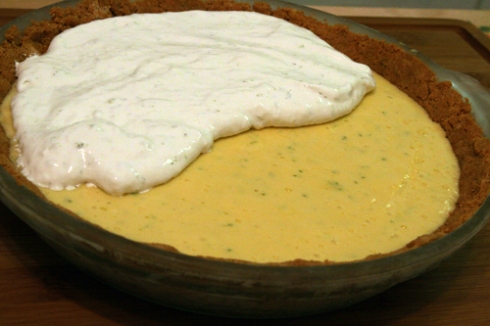
Ina Garten frozen key lime pie

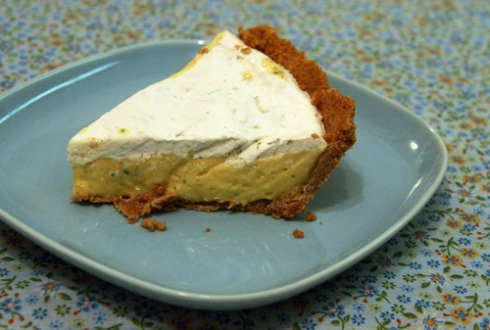
I served this pie with my last post, tequila lime chicken. (Are you sensing a theme?) I loved the crust – graham cracker – an unbeatable classic. And flavor-wise, the filling was about right: tart, but sweet enough to avoid the pucker. I was not crazy about the texture, however. When I first read this recipe, I thought ‘frozen key lime pie’ was a weird title and planned to omit the ‘frozen.’ But it really is an important descriptor. The inner parts of this pie can get a slightly flaky, icy texture, which hurt my sensitive teeth. And somehow the crust was extremely hard to scrape out of the pan, making for messy servings. I think the butter may have frozen to the pan. So, my quest for the perfect key lime pie continues…

Ina Garten frozen key lime pie

RECIPE – Frozen Key Lime Pie

For the crust:
1 1/2 cups graham cracker crumbs (10 crackers)
1/4 cup sugar
6 tablespoons (3/4 stick) unsalted butter, melted

For the filling:
6 extra-large egg yolks, at room temperature
1/4 cup sugar
1 (14-ounce) can sweetened condensed milk
2 tablespoons grated lime zest
3/4 cup freshly squeezed lime juice (4 to 5 limes)

For the decoration:
1 cup (1/2 pint) cold heavy cream
1/4 cup sugar
1/4 teaspoon pure vanilla extract
Thin lime wedges

Preheat the oven to 350 degrees F.

For the crust, combine the graham cracker crumbs, sugar, and butter in a bowl. Press into a 9-inch pie pan, making sure the sides and the bottom are an even thickness. Bake for 10 minutes. Allow to cool completely.

For the filling, beat the egg yolks and sugar on high speed in the bowl of an electric mixer fitted with a paddle attachment for 5 minutes, until thick. With the mixer on medium speed, add the condensed milk, lime zest, and lime juice. Pour into the baked pie shell and freeze.

For the decoration, beat the heavy cream on high speed in the bowl of an electric mixer fitted with the whisk attachment until soft peaks form. Add the sugar and vanilla and beat until firm. Spoon or pipe decoratively onto the pie and decorate with lime. Freeze for several hours or overnight.

Tequila Lime Chicken & String Beans with Shallots

9 Dec

Recipe source: Barefoot Contessa Family Style

“The idea of family is behind much of what defines my cooking style. I want everyone who comes to my house to feel like family.” – Ina Garten


Today’s a twofer! And one I’m excited to post, because both of these recipes are the bomb. I was a little frazzled on the night of my cooking, so this is not a photo-heavy post, but I will update the next time I make it.

tequila - lime - chicken

First off, the marinade for this tequila lime chicken is fantastic, just the right amount of tart, and it makes the chicken very moist, especially since you leave the skin on the breast. When I was titling the above photo, I realized the acronym for this recipe is TLC – exactly what you will feel when you make it for yourself.

To make the marinade, you’ll combine tequila, lime juice, orange juice, chili powder, jalapeno pepper, cilantro, garlic, salt, and pepper in a large Tupperware container, add skin-on chicken breasts, and refrigerate overnight. Grill to blacken just slightly.

green beans w. shallots

String beans are one of many vegetables to recently become at home in my palate. I grew up positively hating them, which I now think was partly because I hated all vegetables, and partly because the ones I ate were canned. I’ll never go back to the can, but fresh string beans are a treat, especially these thin French variety, aka haricorts verts.

This is an extremely simple side dish, and blanching the string beans in advance gives them a beautiful, bright green color and loud, satisfying crunch. You can use regular string beans for this recipe as well, but I like the French variety.

After blanching the string beans, set them aside and melt butter and olive oil in a skillet. Saute shallots until they are lightly browned. I like a coarse chop on my shallots, since they’re not as intense as red or white onions. In the same pan, add the string beans and heat until they are just warm, tossing with kosher or sea salt just before serving. Note: The first time I made these, my package of string beans was half the size Ina calls for, yet I used her full portion of olive oil and butter for sauteeing. The taste was uh-maz-ing, if not the healthiest. But it might just be the trick to this dish, as I haven’t been able to bear cutting my portions down. Good thing I recently took up running.

tequila lime chicken & green beans w. shallots

RECIPE – Tequila Lime Chicken

In warm weather, this chicken flies out of Barefoot Contessa. We can buy boneless chicken breasts with the skin on, but if you can’t get them that way, just buy chicken breasts on the bone and run a sharp knife between the meat and the bone to separate them. It takes a bit of skill but the technique is easy to learn.

1/2 cup gold tequila
1 cup freshly squeezed lime juice (5 to 6 limes)
1/2 cup freshly squeezed orange juice (2 oranges)
1 tablespoon chili powder
1 tablespoon minced fresh jalapeno pepper (1 pepper seeded)
1 tablespoon minced cilantro
1 tablespoon minced fresh garlic (3 cloves)
2 teaspoons kosher salt
1 teaspoon freshly ground black pepper
3 whole (6 split) boneless chicken breasts, skin on

Combine the tequila, lime juice, orange juice, chili powder, jalapeno pepper, cilantro, garlic, salt, and pepper in a large bowl. Add the chicken breasts. Refrigerate overnight.

Heat a grill with coals and brush the rack with oil to prevent the chicken from sticking. Remove the chicken breasts from the marinade, sprinkle well with salt and pepper, and grill them skin-side down for about 5 minutes, until nicely browned. Turn the chicken and cook for another 10 minutes, until just cooked through. Remove from the grill to a plate. Cover tightly and allow to rest for 5 minutes. Serve hot or at room temperature.

Serves 6

RECIPE – String Beans with Shallots

French string beans are the slender ones you are most likely to find in specialty markets, but you can also make this with regular string beans. This recipe can be prepared almost entirely in advance. After the string beans are blanched, all you have to do is sauté the shallots in butter and toss the beans in the pan until they’re warm.

1 pound French string beans (haricots verts), ends removed
Kosher salt
2 tablespoons unsalted butter
1 tablespoon good olive oil
3 large shallots, large-diced
1/2 teaspoon freshly ground black pepper

Blanch the string beans in a large pot of boiling salted water for 1 1/2 minutes only. Drain immediately and immerse in a bowl of ice water.

Heat the butter and oil in a very large sauté pan (12-inch diameter) or large pot and sauté the shallots on medium heat for 5 to 10 minutes, tossing occasionally, until lightly browned. Drain the string beans and add to the shallots with 1/2 teaspoon salt and the pepper, tossing well. Heat only until the beans are hot.

If you’re using regular string beans, blanch them for about 3 minutes, until they’re crisp-tender.

Serves 6

Wheat Berry Salad

8 Dec

Recipe source: Barefoot Contessa Family Style

Considering my recent obsession with wheat berries, I’m happy for any recipes I can find using them. These little gems are an incredibly healthy source of fiber and a great start to a lot of my weekdays, but they are beautiful in salads as well. Their nutty flavor and chewy texture is about as far from lettuce as you can get, so if you’re jonesing for something new, try this!

Cook the wheat berries, either using Ina’s method for a small batch below, or the method in my Wheat Berry Breakfast Bowl post for a large batch (these keep fine in the fridge for a week or two). Set aside, then saute red onion in olive oil, add wheat berries, balsamic vinegar, and freshly ground black pepper back to bowl, and stir to coat berries.

wheat berries & red onion

To this mixture, off the heat, toss in diced scallions, red bell pepper, and carrot (or any other combination of veggies you like). Leave the salad to marinate for a few hours and serve at room temperature. Although the recipe doesn’t call for it, I also added feta cheese to my salad. Because, as Ina would say, how bad can that be?!

wheat berry salad

RECIPE – Wheat Berry Salad

My friend Brent Newsom devised this hearty salad. Wheatberries are a nutty grain that we use to make breads and salads. There are several different types, but hard winter wheatberries don’t get mushy when they’re cooked. If you can’t find them in the grocery store, try your local health food store. They’re delicious, and so good for you!

1 cup hard winter wheat berries
Kosher salt
1 cup finely diced red onion (1 onion)
6 tablespoons good olive oil, divided
2 tablespoons balsamic vinegar
3 scallions, minced, white and green parts
1/2 red bell pepper, small diced
1 carrot, small diced
1/2 teaspoon freshly ground black pepper

Place the wheat berries and 3 cups of boiling salted water in a saucepan and cook, uncovered, over low heat for approximately 45 minutes, or until they are soft. Drain.

Sauté the red onion in 2 tablespoons of olive oil over medium-low heat until translucent, approximately 5 minutes. Turn off the heat and add the remaining 4 tablespoons (1/4 cup) of olive oil and the balsamic vinegar.In a large bowl, combine the warm wheat berries, sautéed onions, scallions, red bell pepper, carrot, 1/2 teaspoon salt, and the pepper. Allow the salad to sit for at least 30 minutes for the wheat berries to absorb the sauce. Season, to taste, and serve at room temperature.

Serves 6

Pumpkin Banana Mousse Tart

7 Dec

Recipe source: Barefoot Contessa Family Style

Ina Garten on tradition: “Every family has traditions–events that they repeat year after year. These traditions give us all a sense of place and community…. Traditions reassure us that we belong together, and for me, that’s so grounding. I love them all.”

One of my family’s traditions at Thanksgiving is that I make dessert. This is mostly because I volunteered, because for a lot of years, dessert was the only kind of food I really liked. As you know from a few posts ago, I made pecan pie for my family and co-workers this year. But I was still left with another Thanksgiving dessert-making opportunity at my monthly cooking group, Gourmet Friends. We have a Thanksgiving-themed get-together every November, and it’s a great chance to test-run the recipes we might be considering for our families.

pumpkin banana mousse tart

This pie is a really nice subtle, elegant twist on classic pumpkin pie, which let’s face it, is a bit pedestrian. My palate is a bit too snobby nowadays for plain ol’ pumpkin pie.

The crust is a basic graham cracker crust, though, to which I can only say, why mess with a good thing? All that’s involved here is graham crackers, butter, sugar, and cinnamon. If you have a food processor, it takes about 5 seconds to break up the crackers, and another two minutes to blend it all together.

pie crust

The filling is a bit more complicated, but not impossible. The most important thing to know about it is to make it in advance. You’ll need to heat half-and-half, pumpkin, brown sugar, salt, cinnamon, and nutmeg in a double-boiler, then add in egg yolks (being careful to temper them so they don’t scramble), then a mixture of dissolved gelatin, banana, and orange zest. The orange zest was one of the things that really attracted me to this recipe!

pie filling

After that mixture has cooled, you will fold in a whipped cream mixture, pour it into the baked crust, and chill for 2 hours or overnight.

pouring pie filling

Finally, the last step is to cover the pie with a whipped cream topping and chill again. Ina suggests sprinkling the top with orange zest, which I think is a classy idea.

whipped cream

I don’t have a picture of a cut slice because I was too busy noshing on it… always a difficulty for me when pie or cake is concerned! But inside this looks very similar to a traditional pumpkin pie. Actually – it’s kinda like this picture I’m shamelessly stealing from a Google search:

pie slice

Ina’s recipe doesn’t call for a pecan-caramel topping, but now that I’m looking at it, it doesn’t seem like a bad idea! I guess I’ll just have to make this again… pity…

RECIPE – Pumpkin Banana Mousse Tart

I wrote this recipe for my entertaining series for California magazine. It was inspired by a pumpkin mousse that my mother had made for years for Thanksgiving. It’s lighter and much more flavorful than that cloying old pumpkin pie. People really do go nuts for it.

Crust
2 cups graham cracker crumbs (14 crackers)
1/3 cup sugar
1/4 teaspoon ground cinnamon
1/4 pound (1 stick) unsalted butter, melted

Filling
1/2 cup half-and-half
1 (15-ounce) can pumpkin puree
1 cup light brown sugar, lightly packed
3/4 teaspoon kosher salt
1/2 teaspoon ground cinnamon
1/4 teaspoon ground nutmeg
3 extra-large egg yolks
1 package (2 teaspoons) unflavored gelatin
1 ripe banana, finely mashed
1 teaspoon grated orange zest
1/2 cup cold heavy cream
2 tablespoons sugar

Decoration
1 cup (1/2 pint) cold heavy cream
1/4 cup sugar
1/2 teaspoon pure vanilla extract
Orange zest, optional

Preheat the oven to 350 degrees F. Combine the graham cracker crumbs, sugar, cinnamon, and melted butter in a bowl and mix well. Pour into an 11-inch tart pan with a removable bottom and press evenly into the sides and then the bottom. Bake for 10 minutes and then cool to room temperature.

For the filling, heat the half-and-half, pumpkin, brown sugar, salt, cinnamon, and nutmeg in a heat-proof bowl set over a pan of simmering water until hot, about 5 minutes. Whisk the egg yolks in another bowl, stir some of the hot pumpkin into the egg yolks to heat them, then pour the egg-pumpkin mixture back into the double boiler and stir well. Heat the mixture over the simmering water for another 4 to 5 minutes, until it begins to thicken, stirring constantly. You don’t want the eggs to scramble. Remove from the heat.

Dissolve the gelatin in 1/4 cup cold water. Add the dissolved gelatin, banana, and orange zest to the pumpkin mixture and mix well. Set aside to cool.

Whip the heavy cream in the bowl of an electric mixer fitted with a whisk attachment until soft peaks form. Add the sugar and continue to whisk until you have firm peaks. Carefully fold the whipped cream into the pumpkin mixture and pour it into the cooled tart shell. Chill for 2 hours or overnight.

For the decoration, whip the heavy cream in the bowl of an electric mixer fitted with the whisk attachment until soft peaks form. Add the sugar and vanilla and continue to whisk until you have firm peaks. Pipe or spoon the whipped cream decoratively on the tart and sprinkle, if desired, with orange zest. Serve chilled.

Saffron Risotto with Butternut Squash

6 Dec

Recipe source: Barefoot Contessa Family Style

Part of the beauty of this cookbook, for me, is Ina’s advice and small observations on entertaining. The idea of “family style” permeates through the book, with comforting recipes like the chicken noodle soup I posted yesterday, fun snacks for kids, and then, especially – quotes like this, which expand the definition of family to one that resonates with me:

“Most people wouldn’t bat an eye about asking their sister to help with dinner, so why are we so reluctant to ask the friends we invite to our house? Wouldn’t you be flattered if a friend said ‘I’d love it!’ when you offered to help? I’d feel valued and part of the A team. When my friends come for dinner, often I serve the main course, but I’ll ask someone else to pour the wine, and a third person to help me with dessert, so we’re all in it together. It’s a community, it’s collaborative, and it’s so much more fun (not to mention easier!).”
I chose to share this quote with you now because risotto requires A LOT of stirring. A lot, a lot, a lot. And Ina brilliantly suggests enlisting your friends to take turns stirring the risotto, preferably with a drink sloshing in the other hand (oh wait, that was my addition), which I think I will do if I ever make this dish again.

Like yesterday’s post, risotto is yet another classic dish I’ve never made. I’ve never been a fan of risotto because of its mushy texture, but the other ingredients in this dish sounded so delicious that I decided to re-open my mind.

The most important lesson I took from making it is that it takes patience. It takes a lot of time. And did I mention – a lot of stirring?

To begin, you will cube and roast a whole 2-lb butternut squash. This is the first recipe I made with butternut, and I discovered that it’s not fun to peel. Not nearly as fun as just throwing the whole thing in the oven until it gets soft, like in this soup.

butternut squash

But there are advantages to this method, specifically, a less mushy, mashed texture. It might be possible to get away with a mash in this recipe… but this time I followed Ina’s instructions. Through trial and error, I found the easiest way to peel this was to cut a flat end and wiggle the vegetable peeler from the top-down. Which doesn’t mean I didn’t break my peeler the second time I did this… so use a very sharp peeler, and go slowly.

peeling butternut squash

While the squash is in the oven, you’ll saute pancetta and shallots in a Dutch oven or the heaviest-bottomed pan you have. Normally when I read this kind of instruction, I am blasé… but with risotto, I wouldn’t mess around. The heat has to be *just right* for this to work, and the cast iron in Dutch ovens will hold the heat more evenly than the type of no-account flimsy Teflon nonsense I own. I borrowed this Dutch oven, which I think would make Ina proud!

Next you’ll add arborio rice and wine, then saffron, salt and pepper, then ladle by ladle, chicken stock. Ina gives very specific instructions on this so I won’t elaborate, except to show you this picture, which I took to be “a little dry” like she describes.

risotto

My final product was also like the “gluey mess” she describes… but tasty. In hindsight, I think medium heat was too low, and medium-high would have been fine. She says you need to make this twice to get it right, and I’m convinced!

I love pears, and I try to eat as many as humanly possible while they are beautiful and yellow in the Fall. So to complete our meal, I served the risotto with Ina Garten’s Endive, Pear, and Roquefort Salad. Since I don’t have a house in the Hamptons, I substituted a common man’s blue cheese for the roquefort. Otherwise, I followed the recipe exactly. This is definitely a favorite… also nice over romaine.

pear salad

And for dessert, I made spiced roasted plums with vanilla bean ice cream.

spiced plums

This was about as autumnal a meal as I could dream up!

RECIPE – Saffron Risotto with Butternut Squash

I used to avoid risotto because I thought you had to stand by the stove for hours, stirring – not exactly my style! But, I decided to give it a try and, instead, found a dish that’s so delicious and cooks in 30 minutes. Test this first on your family and then when you have a party, you can invite your guests into the kitchen for drinks while everyone takes turns stirring the risotto.

1 butternut squash (2 pounds)
2 tablespoons olive oil
Kosher salt and freshly ground black pepper
6 cups chicken stock, preferably homemade
6 tablespoons (3/4 stick) unsalted butter
2 ounces pancetta, diced
1/2 cup minced shallots (2 large)
1 1/2 cups Arborio rice (10 ounces)
1/2 cup dry white wine
1 teaspoon saffron threads
1 cup freshly grated Parmesan cheese

Preheat the oven to 400 degrees.

Peel the butternut squash, remove the seeds, and cut it into 3/4-inch cubes. You should have about 6 cups. Place the squash on a sheet pan and toss it with the olive oil, 1 teaspoon salt, and 1/2 teaspoon pepper. Roast for 25 to 30 minutes, tossing once, until very tender. Set aside. Meanwhile, heat the chicken stock in a small covered saucepan. Leave it on low heat to simmer.

In a heavy-bottomed pot or Dutch oven, melt the butter and saute the pancetta and shallots on medium-low heat for 10 minutes, until the shallots are translucent but not browned. Add the rice and stir to coat the grains with butter. Add the wine and cook for 2 minutes. Add 2 full ladles of stock to the rice plus the saffron, 1 teaspoon salt, and 1/2 teaspoon pepper. Stir, and simmer until the stock is absorbed, 5 to 10 minutes. Continue to add the stock, 2 ladles at a time, stirring every few minutes. Each time, cook until the mixture seems a little dry, then add more stock. Continue until the rice is cooked through, but still al dente, about 30 minutes total. Off the heat, add the roasted squash cubes and Parmesan cheese. Mix well and serve.

*Marcella Hazan advises that correct heat is important in making risotto. It should be “lively”; too high heat and the grains don’t cook evenly, and too low heat will result in a gluey mess. It should cook in 30 minutes. After the first try, you’ll get the idea.

*Saffron is collected from the stamens of crocuses, which is why it’s so expensive. Use the strands, not the powder.

*Pancetta is Italian bacon. If you can’t find it, use any good-quality bacon.

Serves 4 to 6

Chicken Noodle Soup

5 Dec

Recipe source: Barefoot Contessa Family Style

Ina Garten Week

“I’d like to think that when I invite friends to my house, they know what I’m *really* saying is ‘I love you; come for dinner.'” -Ina Garten

Welcome to Day 1 of Ina Garten Week! As I was skimming through this book, I noticed Ina included a lot of classic recipes that might seem simple or “everyday” to be publishing in a cookbook. And yet, I’ve never made a lot of them. Today’s post is one such example – homemade chicken noodle soup. (Jump to recipe) Not only have I not made it, I’ve never made my own chicken stock, which really is a fundamental of cooking.

With a slight wince, this realization made me think of an episode of Gordon Ramsay’s Kitchen Nightmares. He was observing two young, untrained chefs who were making a lot of ultra fancy, high-end food (the kind in little towers on big plates with a balsamic drizzle…), but they didn’t really know much about the basics. One had never shopped for meat before, and both failed a blind taste test to distinguish the difference between beef and pork. Ouch. Finally, Gordon asked them make him an omelet, the first thing they would have learned in cooking school. One said, “I’ve never made an omelet before.” With his classic incredulous look and best sneering British accent, Gordon said, “Oh, don’t be steew-pid!”

So, here goes. I am going to de-stupid myself with a few recipes in this book, starting with chicken noodle soup.

Making homemade chicken stock

From what I can tell, there are no hard and fast rules when it comes to making a stock. The basics are, throw some chicken, vegetables, and seasonings into a large pot, cover with cold water, turn on the heat and let it cook until you think it’s ready.

My inspiration for making my own stock came from a knife skills class we took for my birthday. The instructor taught us to save all our vegetable scraps in a bowl when preparing our mis en place for any recipe – including onion skins, carrot peels, celery stems, garlic heels, herb trimmings, and any other vegetable we find flavorful. (A trio of carrots, onions, and celery is the basis for most soups and stocks, and is called a mirepoix.) Freeze these in large Ziploc bags, and before you know it, you’ll be ready to make a stock. I have also started freezing my veggies just before they turn, if I can tell I won’t have the time or energy to cook with them. I hate throwing away food, and this habit has been a relief to my conscience! Sometimes life just gets in the way after I do my grocery shopping… and unless you’re Martha Stewart or June Cleaver, I imagine you can relate. 🙂

chicken

If you’re making a chicken stock, there are a few options. You can use a storebought rotisserie chicken, as this article suggests, or use the scrap bones, skin, and innards from a bird you’ve carved yourself. I did the latter, after spontaneously deciding to buy and de-bone three whole chickens one night, with nothing more than an online video to guide me. I’m pretty sure I did it wrong, but it was a surprisingly empowering experience!

I was also excited to finally unearth this beautiful Williams-Sonoma pot my mother gave me, which has been sitting for years in its box. This was the perfect pot for making a stock – 8 quarts, with an inner pot for straining pasta, or in this case, chicken and veggies. If you don’t have a pot like this, you can line your pot with cheesecloth to making straining easier.

So to begin, add your chicken, veggies, herbs, salt and pepper into your stock pot, cover with cold water, and bring to a slow boil. Turn heat down to medium and simmer for a few hours, taste-testing as you go, until the stock is flavorful. You will want to skim the chicken’s white fat from the surface periodically. How concentrated you make the stock is a matter of personal preference, but if it is strong, always remember you can water it down later.

To store, you can strain the stock into several Tupperware containers, freeze, then transfer to gallon-size freezer bags until needed. Ice cube trays can also be handy for freezing small amounts of stock. One thing I learned – as the stock cools, a layer of fat will rise to the surface. It is easier to skim this off while the stock is still liquid, so let the stock cool at room temp or in the fridge, if possible. I made my stock at night and wanted to sleep, so it cooled in the freezer. It was slightly more difficult to scrape the fat off the frozen stock.

Making chicken noodle soup

I hope the above doesn’t sound intimidating, because it’s really not, and it’s so worthwhile. After years of fighting with nasty bouillon cubes that would never dissolve and were undoubtedly filled with sodium and preservatives, I smelled my homemade stock and it smelled like chicken noodle soup all by itself! So warm and comforting, I had forgotten what that smell was like. And once you’ve made your stock, the rest of the soup is a breeze.

In a large pot, warm two quarts of chicken stock, then add carrots, celery, and wide egg noodles. I used “No Yolks” brand egg noodles in my recipe, as they have no added cholesterol. In the ten minutes these are cooking, you can prepare your chicken.

Ina Garten suggests roasting a bone-in, skin-on chicken breast, but frankly, I don’t see the point. Finding bone-in, skin-on chicken breast can be difficult, and it’s easy to over-roast and dry out your chicken in the oven. My preferred method is to filet a boneless, skinless breast, sprinkle with salt and pepper, cook through in a pan with a little oil over medium heat, then pull with a fork along the natural lines of the breast to shred. It will look like this.

Once the noodles are fully cooked, add the cooked chicken and parley to the pot and heat through. Season with salt and pepper, to taste, and serve up a big bowl of this comforting goodness!

RECIPE – Chicken Noodle Soup

Forget canned soup – this is the real thing. And wouldn’t we all feel better after eating a bowl? I love having homemade chicken stock in the freezer so I can make this soup in a hurry.

1 whole (2 split) chicken breast, bone in, skin on
Olive oil
Kosher salt
Freshly ground black pepper
2 quarts homemade chicken stock
1 cup medium-diced celery (2 stalks)
1 cup medium-diced carrots (3 carrots)
2 cups wide egg noodles
1/4 cup chopped fresh parsley

Preheat the oven to 350 degrees.

Place the chicken breast on a sheet pan and rub the skin with olive oil. Sprinkle generously with salt and pepper. Roast for 35 to 40 minutes, until cooked through. When cool enough to handle, remove the meat from the bones, discard the skin, and shred or dice the chicken meat.

Bring the chicken stock to a simmer in a large pot and add the celery, carrots, and noodles. Simmer uncovered for about 10 minutes, until the noodles are cooked. Add the cooked chicken meat and parsley and heat through.

Season to taste and serve.

Serves 6

Coming Up: Ina Garten Week!

4 Dec

Like the author of 101 Cookbooks, I, too have a bookshelf full of cookbooks I rarely open. And like her, I am drawn by the call of cookbooks I don’t yet own. In an attempt to save money and save my bookshelf from near collapse, I’ve decided to calm my cravings at the public library. Actually, this idea came after a recent trip to the library that started with one book sought and ended with five in my hand. I’m sure you can relate.

So, I’m thinking of blogging week-long entries on the various cookbooks I check out, starting with Ina Garten’s Barefoot Contessa Family Style.

barefoot contessa family style
Why Ina Garten? Because I love her cakes. And her style. And because I feel like she could be my mom – or the mom of the whole world, for that matter. She’s just so warm and jolly! So come back tomorrow in your bare feet for the commencement of

Ina Garten Week