Tag Archives: potluck

Alicia Silverstone’s Raw Balls

21 May

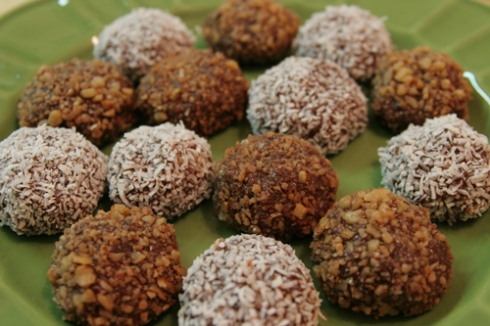
These things – omg omg omg – are the tastiest little morsels ever. Friends who’ve tried them have said

“That’s the best thing I’ve ever tasted”

and

“Those cannot possibly be sugar-free”

and other things that were unintelligible.
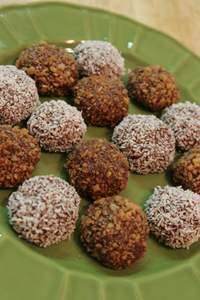
Lately I’ve been making them to control my sugar cravings in the post-lunch lull at work. Dates and pure maple syrup provide benefits such as fiber, potassium, manganese, zinc, and other nutrients, and the fat and protein in the almond butter, walnuts, and almonds counteract their natural sugars, meaning I don’t have the spike (and crash) that I would with something like a cupcake. These are also very rich, so I’m satisfied with one or two. Win!

My only critique of this recipe is that it needs a better name. I had to put Alicia’s name in front of it to give it some credibility. As it is, whenever I say it out loud, I have to say it in a silly voice – because inside, I am a prepubescent. Raw balls. I digress.

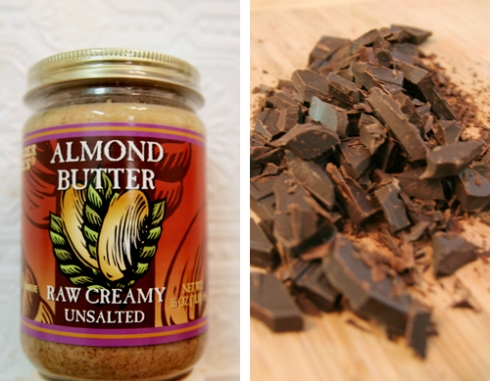
I have made these two different ways. Originally, I used carob chips and processed them into a powder, because my closest health food store didn’t sell carob powder. These are sweetened with malted corn and barley. I also used toasted almond butter, which is sweetened with organic unrefined cane sugar. And, I suppose, not technically raw.

Then I wanted to make a truly refined-sugar-free version, so I processed a bar of unsweetened chocolate (100% pure cacao) and used raw almond butter, which is truly made from nothing but almonds.

Because of the fat and/or moisture content (?) in the chocolate, I wasn’t able to get a true powder consistency – it looked more like instant coffee that’s been hanging around too long – but it did the job.

The chocolate lent a bit more richness to this recipe than the carob, but I enjoy both. Of course, you could also sub unsweetened cocoa powder here. And you could use peanut butter or hazelnut butter instead of the almond… feel free to experiment!

Once all the ingredients are processed into a dough, roll it into 1″-2″ balls, then roll in a topping of your choice. I did half in unsweetened shredded coconut and half in a mixture of cocoa powder, cinnamon, and walnuts.

These get pretty mushy at room temperature, so I’d recommend eating them straight out of the fridge. And if transporting, be sure to do so in a hard, sealed container and not a Ziploc bag… not that you or I would ever make such a mushy mistake…

To your health!

RECIPE – Alicia Silverstone’s Raw Balls

Adapted from The Kind Diet, by Alicia Silverstone
Makes 10 to 12 balls.

1/2 cup walnuts
1/2 cup pitted dates
1/2 cup raw carob powder
1/2 cup maple syrup
1/2 teaspoon vanilla extract
1/4 teaspoon fine sea salt
1/2 cup whole almonds
1/2 cup almond butter
Optional: shredded unsweetened coconut, cocoa powder, instant coffee powder, spices, nuts – for rolling

Place the walnuts in a food processor and process until coarsely ground. Add the dates, and pulse until well combined with the nuts. Add the carob powder, syrup, vanilla extract, and salt. Process until mixture is thick and smooth. Add the almonds, and pulse a few times until combined; you want them to remain in crunchy chunks. Transfer the mixture to a bowl and stir in almond butter with a sturdy spoon.

Form the mixture into golf-ball-size balls with your hands. Roll the balls in the topping of your choice. Place in a sealed container in the freezer until hardened.

Lunchtime Quinoa Salad

22 Jul

Hey! This is an impromptu post because I was excited about my lunch today, and because I’ve been terrible at blogging lately. As such, I don’t have any pictures to share with you. But I hope this might inspire you with a break in the doldrums that can be packing a work lunch.

eat your veggies!
(Ah, what the heck, here’s a picture I stole from the interwebs.)

What I prepped for myself last night might well be called a “fridge-cleaning salad,” because I used almost entirely ingredients I had leftover from other cooking ventures. Here’s how it went:

quinoa – cooked fresh, since I always keep some on-hand from bulk bins
feta cheese – leftover from frittatas and salads
walnut oil, lemon zest, and black pepper – always on-hand
pine nuts – about 1 tablespoon left in the bag
black olives (sliced, from a can) – leftover from a frittata
cherry tomatoes – bought fresh
carrot – bought fresh
cilantro – bought fresh
red bell pepper – leftover from frittata and a tuna salad
onion – leftover from who-knows-what
jalapeno – leftover from a tuna salad

I have a tendency to get bored with cold, lettuce-based salads, so I really enjoyed using quinoa as a base this time. I nuked the quinoa for about 40 seconds and the veggie-feta mixture for about 10, just to remove the refrigerator chill before combining them. Quinoa is a great source of protein and fiber, as well as gluten-free, so it’s primo vegetarian fuel.

quinoaThis site has even more info about quinoa!

My cooking method is to boil 1 1/4 cups of water, then turn the heat to low and add in 3/4 cups of quinoa. Cover and simmer for 15 minutes. I used about half the quinoa in this batch, and the other half I’ll probably prep for breakfast (another blog to come in the future!).

veggie loveMuch to my delight, this made a yummy, healthy, and very filling salad! And it was good geeky fun to see how much I could throw into it. I’m sure I will be making more salads like this in the future.

If you decide to try this out, I’d love to hear about your concoction in the comments section! 🙂

Happy Mother’s Day! (and Lavender Teacookies)

8 May

My mother is a poem
I’ll never be able to write,
though everything I write
is a poem to my mother.
-Sharon Doubiago

Recipe source: Mom

Today’s blog is dedicated to my mom, who gave me this recipe, to thank her for loving weird ingredients like lavender as much as I do! (In case you missed it, also check out her fab lavender lemonade.)

Green Acres Lavender Farm
As I write this, the side door is open and a soft, cool spring breeze is rustling the leaves. Birds are chirping, and I’m thinking about how perfect these cookies are for this time of year. Like all great butter cookies, they have a light and crumbly texture, and a faint sweetness. The floral touch makes them elegant and unusual. And while I’m not especially talented when it comes to decorating, for more creative types, they are a blank canvas for icing. I personally enjoy a simple glaze on these, but the lavender-infused powdered sugar could easily be incorporated into a royal icing. In fact, I’ve adapted a royal icing recipe here for you to try, if your little heart so desires.

The dough for these cookies can be made a day ahead, which is convenient, since the powdered sugar for icing needs to mingle with lavender flowers for at least that long. Otherwise, this is a pretty simple recipe to throw together.

lavender flowers

You will start by smashing culinary lavender flowers with a mortar and pestle, or the back of a spoon. This is crucial to releasing the essential oils in the bud. Mix the flowers with powdered sugar and let it infuse in a plastic bag for at least a day. To make the cookie dough, cream together butter, sugar, more lavender flowers, vanilla extract and lemon extract.

butter mixture

Believe me when I say this is some of the most delicious butter you will ever taste.

lavender butter

Next mix in flour and salt, and refrigerate to firm up, about two hours. If you opt to refrigerate overnight, you may need to let the dough warm up a bit before rolling. Then roll out on a lightly floured surface as you would a standard sugar cookie, and cut into desired shapes. I went for “springy” shapes this time – a bunny, a chickadee, a fish and an elephant. Hey, how’d that last one get in there?

dough cutouts

The lavender flowers in this dough make it really interesting visually. You might notice some of them popping out of your shapes in unexpected ways… I caught one of my bunnies relieving himself and another sprouting whiskers! Feel free to pluck out any flowers that may be awkward to your design, and throw them back into the dough for the next roll.

chickies

Since these cookies aren’t incredibly sweet, I feel the glaze is necessary. Plus I love the smooth, hardened look it gives them. The glazing is easy to do with a basic dinner spoon. Let it dry for several hours or overnight to harden, and enjoy this delicate treat, preferably on a delicate kind of mid-morning Saturday, maybe with a little mimosa and jazz on the radio, or whatever makes you feel peaceful.

hearts

RECIPE – Lavender Tea Cookies

1 tablespoon dried culinary lavender flowers
1 cup butter, room temperature
2/3 cup sugar
1 teaspoon pure vanilla extract
1/4 teaspoon lemon extract
2 cups all-purpose flour
1/8 teaspoon salt
Lavender Glaze (see recipe below)

In a mortar, grind lavender flowers with the pestle. In a medium bowl, cream together ground lavender flowers, butter, sugar, vanilla extract, and lemon extract. Add flour and salt; mix until combined (dough should be soft but not sticky.) Refrigerate 1 to 2 hours or until dough is firm.

Preheat oven to 325 degrees F. Remove dough from refrigerator. On a lightly floured surface, roll dough approximately 1/4-inch thick. Cut into desired shapes with cookie cutters and place onto ungreased cookie sheets. Bake 12 to 15 minutes or until cookies are lightly browned around the edges. Remove from oven and cool on wire racks. When cool, top with lavender glaze and/or royal icing (recipes follow).

Makes 2 dozen cookies.

Lavender Glaze:
1 cup powdered (confectioners) sugar
2 tablespoons dried culinary lavender flowers
2 tablespoons milk
2 teaspoons light corn syrup

In a small plastic bag, combine powdered sugar and dried lavender flowers. Let stand at least 1 day before using. When ready to use, sift the mixture into a medium-size bowl; discarding lavender flowers.

Add milk and corn syrup, mixing well. NOTE: Additional powdered sugar or milk may need to be added (enough milk to make frosting easy to spread). Spread on cooled cookies.

Lavender Royal Icing:
2 egg whites
2 cups powdered (confectioners) sugar
2 tablespoons dried culinary lavender flowers
1/2 teaspoon lemon extract

In a small plastic bag, combine powdered sugar and dried lavender flowers. Let stand at least 1 day before using. When ready to use, sift the mixture into a medium-size bowl; discarding lavender flowers.

Beat egg whites in a large bowl with mixer at high speed until foamy. Gradually add sugar and lemon extract. Beat at high speed until thickened. Dries hard.

blessed

Jicama Slaw with Herbacious Spicy Lime Vinaigrette

5 May

Recipe Source: What We’re Eating

scallions, cilantro, mint, jalapeno

I wish I could take credit for the name of this recipe, but alas, I can’t – it comes from a blog I recently stumbled upon via twitter (@whatwereeating), and the tone of the blog is as sassy as this recipe tastes! I love it, and I think you will, too.

If you think salads are mamby-pamby, think again, because this one is not for the faint of heart! THIS ONE is a flavor EXPLOSION! Or you might even like to say it’s like a party in your mouth. The serrano and raw onion give it a spicy kick, the lime juice and tamarind give it a refreshing tart zip, and the honey and jicama lend just enough sweetness to soften and round it out a bit, so no one flavor is overwhelming, but all blend together for an ultra-unique, utterly fabulous mix.

tamarind paste

This salad is a good deal of work to put together, so I reserve it for occasions where I’m going to be serving people. And so long as a lot of people will be noshing on it, I recommend doubling the recipe below. The way this is written, you will have leftover dressing. If you pair the salad with fish, as the original authors suggest, you can spoon the dressing onto the fish as well. Or save it to dress another salad, or use it all if you like soppy salads and living dangerously.

veggies - jicama, carrots, red onion, snow peas

The only modification I made from the original was to cut the amount of red onion in half, because I found it a bit too intense after a day or so. If you have a food processor with a grating blade, this is the time to use it – the jicama and carrots are shredded with perfect, fast uniformity. This is a great dish to take along to an outdoor summer picnic, I hope you’ll enjoy it!

jicama slaw

RECIPE – Jicama Slaw with Herbacious Spicy Lime Vinaigrette

for salad:
2 cups jicama, thinly julienned
1 cup snow peas, thinly julienned
1 cup carrots, thinly julienned
1/4 red onion, thinly sliced
kosher salt and freshly cracked black pepper

for herbacious spicy lime vinaigrette:
1 packed cup cilantro, roughly chopped
3/4 cup fresh mint, roughly chopped
2 green onions, roughly chopped
1 serrano peppers, roughly chopped, (seeded or unseeded depending on how spicy you like it)
1 1/2 tsp cumin seeds, toasted and freshly ground (can substitute store bought ground cumin but doesn’t have the same flavor)
1 1/2 tbsp tamarind paste
2 tbsp water
2 tsp honey
1/4 cup fresh squeezed lime juice
1/4-1/2 cup canola oil, depending on how tart you like it
kosher salt and freshly cracked black pepper

make the vinaigrette:
Dissolve the tamarind paste in 2 tbsp of water. Add the tamarind/water mixture, cilantro, mint, green onions, serrano peppers, ground cumin, honey, and lime to a food processor. Process the ingredients until the herbs and peppers have been fully pulverized into tiny little bits. While the food processor is running, slowly drizzle in the oil to form an emulsified vinaigrette. Taste the dressing and season with salt and pepper as necessary.

assemble the salad:
In a mixing bowl, add the julienned jicama, snow peas, carrots and red onions. Pour about half of the vinaigrette over the julienned veggies then toss to coat. Taste the salad then season with kosher salt and freshly cracked black pepper as necessary. Chill the salad for at least 20 minutes before serving.

This salad goes great with some simply seasoned and seared fish, such as red snapper. Enjoy!

Celebrating one year of the blog (and Earl Gray teacookies)

18 Mar

Recipe source: The Kitchn

On this day last year, I unceremoniously published my first post on Spork, with no introduction, no mission statement, and very little notice to family and friends. I had just lost my job and had time on my hands. The photo quality was horrible and the layout was wordpress default. I wasn’t sure where I was going with this or how long my newfound hobby would last.

And over the past year, this blog has inspired me in so many ways. I’ve been driven to improve the quality of my photography (and photoshop skills – with a long way to go), and been drawn to books and the example of other blogs on food presentation. I’ve loved the challenge of posting a variety of recipes, and planned my own meals around what I think the blog could use. Through the “veg week” theme, I learned to have a more plant-friendly mindset, and have decreased my consumption of animal products ever since.

As I discovered gorgeous new food blogs on a near-daily basis and connected with other bloggers on twitter, a whole world of food enthusiasts unfolded before me. I’ve been inspired by the passion and creativity I’ve seen on these other sites, and how a lot of these bloggers are making a living sharing their love of food with the world.

I still feel that I am but a small blogger, with a free wordpress account, hardly known amid the sea of cooking content on the web. But I love my little hobby nonetheless, and I’m so grateful for all the feedback I have received – from friends in person, from comments on facebook, from my grandmother who is my #1 fan, and from the occasional stranger who finds me on twitter.

Earl Gray teacookies

So in the spirit of Spring and renewal, here is a recipe for a teacookie I love, from one of my favorite cooking blogs. This is called an ‘icebox cookie’ because you can freeze the dough and cut off just as much as you want to bake at any time. It’s a great way to have fresh cookies without having 42 fresh cookies, all by yourself. 🙂

Earl Gray tea

You can make this recipe with any type of tea you like, but I really enjoy the citrusy flavor of Earl Gray that shines through this cookie. In her notes, Ms. Durand recommends using the tea from teabags rather than loose-leaf, saying that it’s surprisingly more flavorful.

food processor cookie dough

The dough takes about two minutes to whip up in the food processor – score!

Earl Gray cookie dough

Once the dough has a nice, crumbly texture, you will turn it out on a sheet of wax or parchment paper and form it into a log. Chill for at least 30 minutes, or until you are ready to bake. The cookies will crisp up beautifully in a 375-degree oven after about 12 minutes.

I'm a little teapot, short and stout :)

Enjoy with a piping hot cup of tea. Hmmm… I wonder what flavor you’ll choose?

RECIPE – Earl Grey Tea Cookies
makes 2 dozen

1 cup all purpose flour
1/4 cup sugar
1/4 cup confectioners’ sugar
1 tablespoon Earl Grey tea leaves*
1/4 teaspoon salt
1/2 teaspoon vanilla
1 teaspoon water
1/2 cup unsalted butter

Preheat oven to 375°F. Pulse together all the dry ingredients in a food processor until the tea leaves are pulverized.

Add vanilla, water, and butter. Pulse together until a dough is formed. Form the dough into a log onto a piece of wax or parchment paper. Wrap the paper around and roll the log smooth. Freeze now, or chill for at least 30 minutes.
When chilled, slice the log into 1/3 inch thick pieces. Place on baking sheets and bake until the edges are just brown, about 12 minutes. Let cool on sheets for 5 minutes, then transfer to wire racks.

*One would think that expensive loose leaf tea would be best in this recipe. But I’ve actually gotten the best flavor with tea from cheap bags that I’ve ripped open. I think the leaves are more fine and flaky.

White Bean Dip

20 Nov

“What garlic is to food, insanity is to art.”
Anonymous

Recipe source: Everyday Italian by Giada di Laurentiis

As Michael Jackson said, it doesn’t matter if you’re black or white. My Black Bean Hummus recipe had a Mexican flair, while this recipe is Italian. See, it really is possible to promote tolerance and world peace through food! Amen.

Like the black bean version, this dip is a quickie to whip up in the food processor. Actually, slightly more quickie, because there are fewer veggies to chop. So when you’re done… you can have a quickie?

Moving on. My recommendation for the garlic is to peel it and chop in large chunks. Whatever you do, don’t use a garlic press for this recipe – the food processer will take care of chopping it up, and the more intact you keep the clove, the stronger the bite will be. This dip is great for raw veggies, I made it to get some carrots into my belly this week!

white bean dip

RECIPE – White Bean Dip with Pita Chips

1 (15-ounce) can cannellini beans, drained and rinsed
2 cloves garlic
2 tablespoons fresh lemon juice
1/3 cup olive oil, plus 4 tablespoons
1/4 cup (loosely packed) fresh Italian parsley leaves
Salt
Freshly ground black pepper
6 pitas
1 teaspoon dried oregano

Preheat the oven to 400 degrees F.

Place the beans, garlic, lemon juice, 1/3 cup olive oil, and parsley in the work bowl of a food processor. Pulse until the mixture is coarsely chopped. Season with salt and pepper, to taste. Transfer the bean puree to a small bowl.

Cut each pita in half and then into 8 wedges. Arrange the pita wedges on a large baking sheet. Pour the remaining oil over the pitas. Toss and spread out the wedges evenly. Sprinkle with the oregano, salt, and pepper. Bake for 8 to 12 minutes, or until toasted and golden in color.

Serve the pita toasts warm or at room temperature alongside the bean puree.

Crunchy Oriental Chicken Salad

28 Sep

Recipe source: my friend Stephanie

Here’s a new favorite salad recipe, thanks to my Gourmet Friend Stephanie. She made this for our summer picnic potluck, and I was so excited she did, because I’d had something similar at our July 4th picnic, but forgot to ask that friend for his recipe.

This isn’t exactly what I’d call a *healthy* salad, due to the sodium content in the ramen spice packet and sugar in the dressing. But, we can’t always be healthy, can we? Time to accept the facts of life.

I love this picnic for a potluck or just on a hot day. Like this past weekend, for example… after a summer of weak low-70s weather, our Fall is kicking off with a heat wave of 100+ temperatures. So, salad time!

To start out, you’ll need to cook a chicken breast. You can do this any way you like, really, but I’m a fan of shredded chicken. To accomplish this, I filet my chicken breast, sprinkle with salt and pepper, cook through in a pan with a little oil over medium heat, then pull with a fork along the natural lines of the breast.

shredded chicken
The next step is to cook the ramen noodles. They should be very finely chopped. The first time I made this salad, I crumbled it all apart with my bare hands, which, wimpy though it is to say, made my hands a bit sore. The next time, I put the block in a large mixing bowl and crushed the life out of it with a dough cutter. It worked great!

Once you have attained fine bits of ramen, melt 3 tablespoons of butter in a pan, dissolve in the ramen seasoning packet, then add the noodles and cook, stirring constantly, for a couple minutes. Then toss in 2 tablespoons of sesame seeds and stir it some more.

Ramen noodles
Remove the ramen mixture from heat and allow it to cool. In the meantime, prepare a dressing of white wine vinegar, vegetable oil, sugar, and pepper. Toss the chicken and ramen mixture with the dressing, along with coleslaw mix, dry-roasted peanuts and green onions.

Light, crunchy, delicious. YUM!

crunchy oriental chicken salad

RECIPE – Crunchy Oriental Chicken Salad

3 tablespoons butter or margarine
1 package (3 ounces) Oriental-flavor ramen noodle soup mix
2 tablespoons sesame seeds
1/4 cup sugar
1/4 cup white wine vinegar
1 tablespoon vegetable oil
1/2 teaspoon pepper
2 cups cut-up cooked chicken
1/2 cup dry-roasted peanuts
4 medium green onions, sliced (1/4 cup)
1 bag (16 ounces) coleslaw mix (or chop your own cabbage and carrots)

Melt butter in 10-inch skillet over medium heat. Stir in seasoning packet from noodles.

Break block of noodles into fine pieces over skillet; stir noodles into butter mixture. Cook 2 minutes, stirring constantly; stir in sesame seed. Cook about 2 minutes longer, stirring constantly, until noodles are golden brown.

Mix sugar, vinegar, oil and pepper in large bowl. Add remaining ingredients and toss. Toss in noodle mixture just before serving.

Pumpkin Bread

24 Sep

Vegetables are a must on a diet. I suggest carrot cake, zucchini bread, and pumpkin pie.
~Jim Davis

Recipe Source: bread – online somewhere, years ago / frosting – allrecipes.com

I love the fall, and some years (including this one), my birthday lands on the first day. I love all things Fall – leaves turning color and the concept of change that they represent, crisp cool air, and spice and pumpkinstuff everywhere. So every fall, I make homemade pumpkin bread.

pumpkin bread

At first, my mom made it from a box mix. But when I moved, I couldn’t find the mix, and eventually I wasn’t satisfied to wait for the extra loaves she made me when I visited. I searched online and ended up settling on this recipe. I’ve made it in loaves and muffins, and frosted muffins to make cupcakes.

pumpkin muffin

Often, I like to buy decorative mini loaf pans at Michael’s ($1!) and give them as gifts to co-workers and friends. Since Fall gets jilted by everyone thinking Winter starts the day after Thanksgiving, I like to make a special effort to celebrate this season.

 mini loaf pan

RECIPE – Pumpkin Bread

3 ½ cups all-purpose flour
2 tsp baking soda
2 tsp salt
1 tsp baking powder
1 tsp ground nutmeg
1 tsp ground allspice
1 tsp ground cinnamon
½ tsp ground cloves
3 cups white sugar
1 cup canola oil
2 cups solid pack pumpkin puree
4 eggs, beaten

Preheat oven to 350°F. Grease two loaf pans.

In a medium mixing bowl, combine flour, baking soda, salt, baking powder, nutmeg, allspice, cinnamon and cloves.

In a large bowl with an electric mixer, blend sugar, oil and eggs. Stir in pumpkin. Slowly blend the flour mixture into pumpkin mixture. Pour the batter into two prepared loaf pans.

Bake for about 60 minutes. Let cool for 10 minutes before removing from the pans.

pumpkin cupcake

And since I mentioned cupcakes, I will suggest a frosting. You didn’t think I would be so cruel as to overlook frosting, did you?

RECIPE – Allspice cream cheese frosting

1 (8 oz) package cream cheese, softened
1/3 cup butter, softened
3/4 teaspoon ground allspice
4 cups confectioners’ sugar
1 teaspoon vanilla extract
2 tablespoons milk

In a medium bowl, blend the cream cheese, butter, and allspice.

Gradually mix in the confectioners’ sugar, vanilla, and milk until the mixture is spreadable.

Black Bean Hummus

13 Jul

Recipe source: Julie via La Fuji Mama

It’s Summa-Summa-Summatime! Warm and sunny and time for picnics! This is a perfect dish to take to a picnic, or any other get-together where you have to bring along a side dish. (Jump to recipe)

I got this recipe from a great new food blog I found recently, La Fuji Mama (check out her Carrot Halwa – OMG! making soon…). I was really excited to find it, because I am completely burned out on hummus. Or, as my old roommate would say, “I am so over hummus.”

black bean hummus

I only changed the recipe a little – to make it more moist I added more lime juice, more tomatoes and a little bit of olive oil (though drastically less than traditional hummus).

All you do is throw black beans, cilantro, garlic, tomatoes, serrano chile, lime juice, cumin, cayenne, and salt into a food processor and blend away. Both times I’ve made this, I doubled the recipe, so you may want to have enough ingredients on-hand to do the same. One batch will be gone before you know it!

pita chips

To make homemade pita chips, I tear open the pita (I like my chips thin), cut it into triangles, brush one side with olive oil, and sprinkle on a mixture of fine-grain sea salt and Italian seasoning. You can use any seasoning you like on these, depending on what you’re serving them with. Then they bake at 350 degrees F for about 7 minutes, until lightly browned.

Ta-da!

(and thanks to Kim, my lovely hand model :))

RECIPE – Black Bean Hummus

1 (15 oz) can black beans, drained
3 tablespoons chopped cilantro
1 clove garlic, pressed
1/2 cup diced tomatoes
1/2 serrano pepper
1 tablespoon lime juice
2 teaspoons cumin
1 teaspoon cayenne
1 teaspoon kosher salt

Cut the leafy tops off the stems of your cilantro. Roughly chop the leaves, for an equivalent of about 3 packed tablespoons.

Cut your serrano pepper in half, width-wise. You only need one of the halves for this recipe. Cut the remaining half in half, length-wise, and remove seeds. Chop the pepper.

Roughly chop about 1/2 of a large tomato.

Add the cilantro, tomato, serrano pepper, garlic, spices, olive oil, and drained beans to a food processor.

Squeeze the lime juice into the processor as well. Puree.

This will yield close to 2 cups of hummus, which is about 4 servings as an appetizer. Serve with tortilla chips or pita bread.

Cucumber & Black-Eyed Pea Salad

21 Apr

Food is an important part of a balanced diet.
-Fran Lebowitz

Original recipe source: foodnetwork.com / eatingwell.com

Around this time last year, I developed a sudden, severe contempt for lettuce. I couldn’t stand the thought of any salad containing it. Dramatic? Yes. But anyway, I went in search of non-lettuce-containing salads, and found this recipe. It’s now a favorite, and I don’t even know how many times I’ve made it. I’ve taken it to several get-togethers and it’s always a hit, I think because it has so many flavors going on. If you were to use tricolor peppers, it would even be a good chakra salad! A dead horse you say? Okay okay, moving on…

First, make a dressing by whisking together olive oil, lemon juice, oregano and fresh ground black pepper.

Next, dice cucumbers, red onion and red bell pepper. To minimize water, I scrape the seeds out of my cucumbers. If you don’t plan to eat all the salad at once (i.e. serve it to a lot of people), it helps to salt the cucumbers for several hours or overnight to draw out the water, you can then rinse and pat them dry. The original recipe called for peeling the cucumber, but I like the skin, and I’m convinced there are probably some nutritional benefits in there. But you can peel it, or use my mom’s happy medium and peel the skin in stripes.

Add to the veggies rinsed and drained black-eyed peas, feta cheese and chopped black olives. For some reason, black-eyed peas can be extremely difficult to find, even in a basic supermarket. If you can’t find them, you can substitute white or pinto beans, no problem. Toss all ingredients to combine, and serve.

3 tablespoons extra-virgin olive oil
2 tablespoons lemon juice
2 teaspoons chopped fresh oregano OR 1 teaspoon dried
Freshly ground pepper, to taste
2 cucumbers, diced
1 (14 oz) can black-eyed peas, rinsed
1 red bell pepper, diced
1/2 red onion, diced
1/2 cup crumbled feta cheese
2 tablespoons chopped black olives

Whisk oil, lemon juice, oregano and pepper in a large bowl until combined. Add cucumber, black-eyed peas, bell pepper, feta, onion and olives; toss to coat. Serve at room temperature or chilled.