Tag Archives: family

Tarte Aux Pommes (Apple Tart)

15 Nov

Good apple pies are a considerable part of our domestic happiness.
~Jane Austen

French apple tart

Recipe source: David / Daniele

Today I want to share a very special recipe for classic French apple tart. This is a simple, elegant dessert where the fruit really shines – it has only a few ingredients, and little to no refined sugar. The basic recipe lends itself to a lot of creativity, with all kinds of options for jam and fruit. I really like apples because they’re not so juicy that they make the crust soggy. And since Fall is apple season, they’re plentiful!

. . . . . . . . . . . . . . . . . . . . . . . . . . . . .

But before we bake…

Besides the obvious – deliciousness – I have another reason to get your mind on pie: the Mama’s Pie in the Sky Bake Sale.

If you live in San Diego, this annual fundraiser is just the thing to round out your Thanksgiving meal! Skip the Vons bakery and help out a good cause.

Mama's Pie in the SkyFrom the press release:
Dozens of San Diego County top chefs, caterers and bakers will lovingly prepare thousands of pies to raise much-needed funds for Mama’s Kitchen. The Mama’s Pie in the Sky Bake Sale is a Thanksgiving tradition, and is considered to be the west coast’s largest bake sale. Each $20 pie provides more than six home-delivered meals to a neighbor struggling with a critical illness such as cancer or HIV/AIDS.

All proceeds from pie sales go directly into funding thousands of free, hot and nutritious Mama’s Kitchen meals, which help ensure that no one living with AIDS or cancer will go hungry in the San Diego community.

Mama’s Kitchen hopes to sell more than 6,250 pies before Nov. 20, which will raise $125,000 and fund nearly 40,000 meals. With the rising cost of food purchased to prepare the meals delivered by volunteers to hundreds of men, women and children in San Diego County, the funds raised through the Mama’s Pie in the Sky fundraiser are needed more than ever.

Here’s how Mama’s Pie in the Sky works:

1. Visit www.mamaspies.org to purchase the Thanksgiving pies of your choice: apple, pumpkin, pecan, or no sugar added apple pies. If you have a friend or colleague selling pies, choose their name. Otherwise you can just purchase from Mama’s Kitchen directly.

2. Select a convenient pick-up location. The pies will be available for pick-up at one of 19 Wells Fargo Bank branches throughout San Diego County or at Mama’s Kitchen, located at 3960 Home Avenue, San Diego, Calif. 92115.

3. Go to the location you selected on Wed., Nov. 23 between 10 a.m. and 4 p.m. to pick up your pie(s) from one of our volunteers. When you open your pie, you’ll discover what baker prepared your pie.

4. To purchase a pie that will be hand-delivered to Mama’s Kitchen’s clients on Thanksgiving morning, select the “Love-A-Client” option. For every “Love-A-Client” pie purchased, the donor will receive an entry to win a 64MB iPad2.

There is still time to sell pies this year. Mama’s Kitchen is looking for individuals and groups to form teams to sell pies before Nov. 20. Volunteers also have opportunities to win prizes from generous sponsors. To sign up to sell pies, visit www.mamaspies.org.

But don’t just take my word for it! Here’s a little message from Sam “The Cooking Guy” Zien and Elizabeth Harris of Elizabethan Desserts –

The last day to purchase the handcrafted pies is Nov. 20, 2011. Fifteen dollars from each $20 pie sale is tax-deductible. Pies can be purchased online at www.mamaspies.org or by calling (619) 233-6262.

. . . . . . . . . . . . . . . . . . . . . . . . . . . . .

OK! Back to the blog…

If you’ve been reading this blog for a while, you might know that I’m a big fan of homemade pastry crust. That is largely thanks to David, who taught me this recipe. So I thought it would be appropriate to pass on a few crust-making tips from the pro:
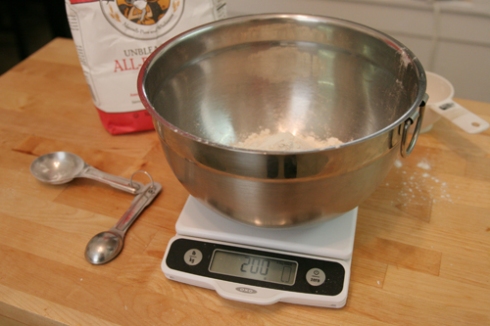
kitchen scaleThe scale! An essential kitchen item.

The perfect weights for this pastry dough are 200 grams of all-purpose flour, 100 grams of cold unsalted butter, and 100 grams of ice-cold water. This will make crust for an 11-inch tart. But if you insist on cheating, this was about 2 cups + 3 tablespoons flour, 1/2 cup minus 1 tablespoon butter, and just under 1/2 cup of water.

Probably, the best way to make a pastry dough is the old-fashioned way: working the cold butter into the flour, rolling it until the butter turns into thin sheets of flaky pastry goodness, then carefully and gradually working in a bit of ice-cold water. But the fastest way is in the food processor.

However you bring your crust together (don’t worry, more help below), you’ll want to turn it out on a sheet of plastic wrap, form into a disc, and freeze for at least an hour. You can see here that chunks of butter are still intact – a good thing!

wrapped pastry dough

Skipping ahead (okay, so I’m not actually in the mood to give tips tonight – check out this earlier post for step-by-step instructions!)… once your crust is in the tart pan and pre-baked, it’s on to the fun part! The filling. The base of this tart is traditionally a fruit spread, and you can use any kind you like: apricot or blackberry, pumpkin butter, or maybe even Nutella.

confiture collage

This time, I used the Bonne Maman chestnut creme I brought back from a summer trip to France. Unfortunately, it’s nearly impossible to find in the U.S.

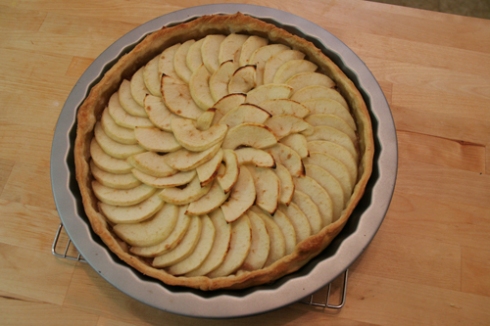
You only need a thin spread (about 2 tablespoons), then you will commence layering 5 peeled, cored, and thinly sliced Granny Smith apples in a pretty design, like so:

French apple tart

If you have an apple peeler corer slicer, lucky you! You’ll save the hand cramp I got after refusing to buy a fourth one. If not, just think positively about how slicing these uniformly is going to improve your knife skills.

Granny SmithLooks sweet and innocent, right?

It can be nice at this stage to sprinkle a layer of sugar over the top of the apples before baking. Or, you can brush a light coating of light-colored jam (such as apricot) or maple syrup over the top while it’s still hot from the oven.

sugared apples

Bake at 450 degrees F for 25-35 minutes, or until the crust is slightly brown and completely firm, and apples are desiccated. Serve warm or room temperature.

French apple tart

Recipe – Tarte Aux Pommes (Apple Tart)

200 grams all-purpose flour
100 grams cold unsalted butter
100 grams ice-cold water
1 teaspoon sugar, optional
1/4 teaspoon cinnamon
1/4 teaspoon salt
2 tablespoons fruit spread of your choice
5 Granny Smith apples
2 teaspoons granulated sugar, optional
1 teaspoon nutmeg, optional

To make the dough, sift and weigh 200 grams of all-purpose flour into a large bowl, stir in sugar, cinnamon, and salt, and cut in 100 grams of cold butter. With your hands, gradually mix in 100 grams of ice-cold water until all is well combined. (This step can be done in a food processor, but be careful not to over-process the butter at this stage.) Turn the dough out onto a cold surface and with your hands, form into a disk, wrap in cling film, and refrigerate for 30-60 minutes.

Remove dough from refrigerator and turn out onto a cold surface. Roll it to a thin round disc, fold in half and then into thirds, and wrap tightly in cling film; refrigerate for another 30 minutes.

Remove dough from refrigerator and roll it one last time, as round as possible, leaving about 1″ to go up the sides of the pan. Fold the dough in quarters and place it in a 15″ tart pan with a removable base. Unfold and press the dough into all sides, using a rolling pin to trim excess dough from the top edges of the pan. Cover the top of the dough with cling film and refrigerate until ready to assemble the tart.

Preheat oven to 450 degrees F. Peel and core apples, slice into 1/4-inch rounds, then cut in half. Remove the tart pan from the refrigerator and spread the bottom crust evenly with your preferred jam (apricot, boysenberry, or chestnut creme all work nicely).

Starting on the outer edge and moving inward, tightly overlap the apples until all slices are used. Sprinkle the entire surface with a light layer of sugar and nutmeg, if desired. (For those going sugar-free, you can brush a light layer of jam over the apples just before baking, and this will create a nice shine on the surface. I recommend St. Dalfour brand, which is only sweetened with grape juice concentrate.)

Bake immediately for 25-35 minutes, or until the crust is slightly brown and completely firm, and apples are desiccated. Serve warm or room temperature.

-apple illustration-
http://www.inkart.com/pages/food/apple.html
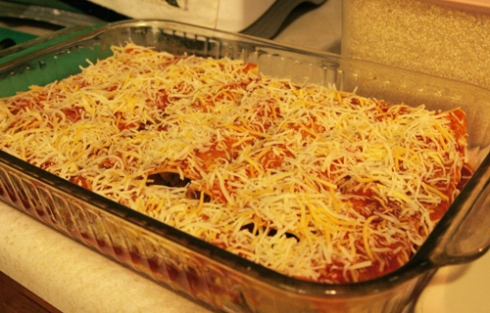
Post-Thanksgiving turkey enchiladas

27 Nov

Friday turkey enchiladas are a tradition in my family. I look forward to them almost as much as the Thanksgiving meal itself. This is a quick and easy way to use up your leftovers, and a change of pace from the classic holiday flavors. Of course, in Santa Maria, Mexican food is the classic taste all year ’round!

To start, thinly slice or shred your leftover turkey, white or dark meat, whichever you prefer. We use the breast meat for this.

turkey

In the bottom of a 9×13 glass baking dish, spread a thin layer of enchilada sauce. You can use corn or flour tortillas, but corn are traditional. My mom has found that warming the tortillas makes them more malleable; you can do this over an open flame or on a pre-warmed skillet, just until the edges soften.

olives, chilis, enchilada sauce(The most cans you will ever see assembled together on this blog. I promise.)

Then, pile turkey, sliced black olives, green chilies and Mexican blend shredded cheese in the center of each tortilla.

tortilla(Who didn’t grow up with Corel dishware?)

Be sure to leave yourself enough tortilla to roll it, and place the roll, seam-side down, into the sauced 9×13 pan. Continue rolling enchiladas and stacking them side-by-side until you have filled the pan. The corn tortillas are about 8″ in diameter, and we usually get about 12-14 enchiladas in the pan.

enchiladas

Cover each enchilada with sauce, making sure no tortilla is exposed. This advice comes from the experience of biting into tough, chewy tortilla that was not covered in sauce… so trust us on this one!

enchiladas

Then cover the entire pan with shredded cheese and bake at 350 degrees F for 30 minutes, or until cheese has melted. Served here with refried black beans, tortilla chips from the best Mexican restaurant in town, and quinoa.

post-Thanksgiving Mexican feast(I’m not posting this quinoa recipe because it wasn’t great. But try this one: Spanish-style quinoa. Add a little S&P. Yummy.)

Lillian’s Lavender Lemonade

19 Jul

“We are living in a world today where lemonade is made from artificial flavors
and furniture polish is made from real lemons.”  -Alfred E. Newman

Recipe source: my mother

lemons

As a follow-up to my last post on summery picnic foods, I bring you my mother’s lavender lemonade. Two summers ago, we took a trip to Green Acres Lavender Farm in Atascadero, CA and my mom picked up two lavender plants that are doing very well today. She came up with this recipe as a way to use some of the flowers. What brilliance! (Jump to recipe)

lavender & bee

The thing that makes this lemonade a lavender lemonade is a simple syrup infused with lavender flowers. I think making infusions is a really neat thing in cooking, because it’s so easy but brings out so much flavor, and you can create some of the same things at home on the cheap that you would pay a high price for in a gourmet market. (See my post on rosemary popcorn for another example.)

dried lavender

First, make a syrup by boiling 2 1/2 cups of filtered water, then removing from heat and stirring in 1/2 cup of sugar until it dissolves. Then add 1 tablespoon of lavender, cover, and leave to infuse 30 minutes.

lavender infusion

While the lavender is releasing all its floral goodness, squeeze enough lemons into a 2 qt pitcher for 1 cup of juice. I’d recommend Myer lemons for this, if you can get your hands on some.

juicing lemons

Strain lavender and add syrup to lemon juice, then top with water to fill pitcher.

Depending on the tartness of your lemons, you may want more or less sweetness from the syrup. If you’re concerned about too much sweetness, add the syrup gradually. If anything, you will most likely want more sweetness. In that case, you can add plain simple syrup, which I’d recommend having on-hand anyway, as it’s great for mixing into all sorts of beverages. You can make a simple syrup by dissolving 1 part sugar into 1 part water.

This lavender-infused syrup is also great for mixing into tea, sparkling water, or cocktails. In the case of tea, I prefer a 1:1 ratio of sugar to water, but you’ll figure out your preferences as you go.

Enjoy this one, and happy summer!

chairs in lavender field

Note for San Diegans: I found my culinary lavender at a great little herb shop in Ocean Beach, In Harmony Herbs & Spices. I have also seen it at World Market, and I’d imagine Whole Foods carries it as well.

RECIPE – Lillian’s Lavender Lemonade

2 1/2 cups water
1/2 cup sugar
1 cup lemon juice
1 tablespoon dried lavender flowers
Icewater to fill pitcher (4 cups)

Dissolve sugar in boiling water. Add lavender flowers, remove from heat, and cover. Allow lavender to steep in syrup for 15 minutes to an hour, depending on desired strength. Combine lavender syrup with lemon juice in a large pitcher and fill remaining space with icewater.

VARIATIONS –

Make lavender iced tea by mixing lavender-infused simple syrup (1 pt water, 1 pt sugar) with freshly brewed black tea.

Mix lavender simple syrup into lemon sparkling water or use it to sweeten cocktails.

Springtime Quiche

11 Jul

*** WARNING! ***
This recipe is not for the faint of heart. It is not for the vegetarian.
It’s probably not even for the Californian.
No, this recipe is for Paula Deen.

Recipe source: Mom / Land O’ Lakes cookbook

Don’t y’all just loooove quiche? I do! Because it’s a hearty, filling, one-dish meal. And so versatile! Is it a breakfast food? Is it a lunch or dinner food? It’s anything you want it to be, baby! It’s not for sissies – it’s QUICHE.

quiche

There are many ways to make quiche, but this recipe, handed down from my mother, is my favorite so far. It’s got ham…

ham

bacon…

(not pictured… uhhh, the samples went in my mouth?)

cheddar cheese…

cheddar cheese

and asparagus. (See? Practically a diet food.)

asparagus

But before you can add any of that, you must start with the foundation: crust. The recipe calls for chives, but I didn’t have any, so I added 1 teaspoon of dried oregano and 1/2 teaspoon garlic powder. You can adjust the flavorings to your taste, or make a plain crust. Or you can forget about all this, buy a pre-made crust and skip to the filling part.

To make the crust, you will cut cold butter into a mixture of flour and salt, then add your flavorings and a smidgin of water. The texture will look something like this:

dough texture

Next, turn the mixture out onto a work surface and shape into a ball, before rolling out with a rolling pin. This was as close as I got to a ball…

dough ball

In my experience, rolling out dough is a terribly un-fun, slightly nerve-wracking process that seems to take forever. I stress that I won’t have enough dough to stretch far enough, then I stress about the decidedly un-round shape my dough is taking, then before I know it, I’ve rolled out too far. So around the time I’m well into my worrying tendencies, I stop to put my pie dish on top of the dough. Then I estimate about two inches around the sides, and tear off the sections that are too long to piece them into the sections that are too short.

pie dish

Once your crust is rolled out, fold it in four to make it easier to lift and place into the pie dish. Use your thinnest scraper to slide underneath the dough.

folded dough

Prick the crust all over lightly with a fork, and pre-bake for 10 minutes. Then layer with cheese, ham, and bacon, and top with asparagus in a spoke pattern.

uncooked quiche

Over this, add egg, half & half, and salt and pepper mixture, then return to oven and bake until brown and set in center, about 40 minutes.

finished quiche

RECIPE – Springtime Quiche

Crust Ingredients:
1 cup all-purpose flour
1/4 teaspoon salt
1/3 cup cold butter
2 tablespoons chopped fresh chives
(alt: 1 tsp dried oregano and 1/2 tsp garlic powder)
2 tablespoons cold water

Filling Ingredients:
2 cups (8 oz) cheddar cheese, shredded
6 slices crisply cooked bacon, cut into 1-inch pieces
1 1/4 cup diced ham
pound fresh asparagus spears
1 1/2 cups half & half
4 eggs, slightly beaten
1/4 teaspoon salt
1/8 teaspoon pepper

Heat oven to 375°F.

Combine flour and salt in medium bowl; cut in butter with pastry blender or fork until mixture resembles coarse crumbs. Stir in flavorings and water just until flour is moistened (mixture will be crumbly). Shape into ball; flatten slightly. Roll out dough on lightly floured surface into 12-inch circle. Fold into quarters.

Place dough into ungreased 10-inch quiche pan or 9-inch glass pie pan; unfold, pressing firmly against bottom and sides. Trim crust to 1/2 inch from edge of pan. Crimp or flute edge of crust. Prick with a fork and bake for 10 minutes.

Layer cheese, bacon, and ham over crust. Place asparagus spears in spoke pattern on top of bacon.

Combine all remaining filling ingredients in small bowl. Pour over asparagus-cheese mixture. Bake for 40 to 45 minutes or until golden and set in center. Let stand 10 minutes before serving. Serve warm.

Shameless self-promotion!

8 Jul

Some of you may know that I volunteer as a writer for the Worldview Press, a nonprofit online news magazine promoting multicultural awareness around San Diego and beyond. Last month, the staff got together for a picnic and we all brought a dish from our cultural heritage. I brought my great-grandmother’s baklava, which was consumed hastily and the recipe requested as soon as mouths were empty enough to talk.

Photo by Tom Johnston-O’Neill

The fantastic editor-in-chief, Tom, asked to post it as Recipe of the Month, and I’m honored to share the article with you!

Check it out here: Macedonian Baklava

I will post my own blog about this eventually… like maybe in the couple months after it takes me to recover from eating so much of it.

Tuna Casserole

19 Mar

As a child my family’s menu consisted of two choices: take it or leave it.
-Buddy Hackett

This is a dish I ate allll the tiiiime growing up, and still make. I always keep these ingredients in my pantry. It’s quick, easy and filling. Just beware when serving – I always overestimate how much I can actually eat! This recipe is also great for leftovers as it reheats well. You can substitute albacore tuna for the chunk light, but the mushroom soup tones down the fishy taste enough that I say go for the cheap stuff 🙂

This is a basic recipe, so feel free to add any other ingredients that sound interesting. Like peas maybe… peas were banned from my house growing up as my mother hated them, but now I always have a bag in my freezer because they’re just so easy to throw into anything at the last minute.

1 (12 oz.) can chunk light tuna (water-packed), drained
1 (14.5 oz.) can cream of mushroom soup
1 cup milk (half of soup can)
2 cups white rice
Chow Mein noodles, to sprinkle

Prepare rice. Combine tuna, cream of mushroom soup and milk in a medium saucepan over medium heat and cook, stirring occasionally, until milk reduces slightly and sauce turns gray, about 10 minutes. Pour sauce over rice and top with chow mein noodles.